my dream custom
- This topic has 295 replies, 27 voices, and was last updated 3 years, 8 months ago by
 David.
-
AuthorPosts
-
August 4, 2016 at 08:24 #41648
 Kenneth KristianssonParticipant
Looks good and as you said there´s many ways to do it. Looking forward to see what other mods you have in mind.Thanks or sharing
August 4, 2016 at 10:53 #41652 Quentin HallParticipant
Nice work. I can imagine the smile on your face.
August 4, 2016 at 10:58 #41653 Rik HovingKeymaster
Great to see a dream project come to reality.
Looks great. And thank you for documenting it and sharing the step by step process.I have digitally dropped the car a little… for better looks.
Enjoy the beauty of Customizing
August 4, 2016 at 14:14 #41666 pkeritParticipant
That looks great! On post 41639 how do you make sure that the roof will flow smoothly into the rear window without a hump or dip?
August 4, 2016 at 21:58 #41700mike sutton
ParticipantGreat to see a dream project come to reality.
Looks great. And thank you for documenting it and sharing the step by step process.I have digitally dropped the car a little… for better looks.
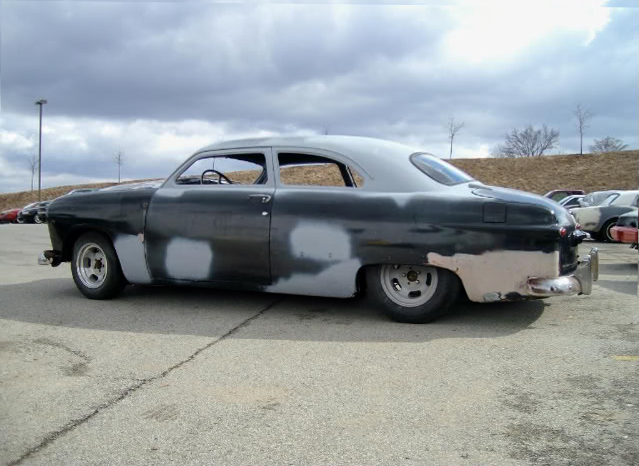
holy cow, what a difference! thanks rik. like i said earlier, this project has been going on for 8 years now so it’s a lot further along than what you see here. i’ll keep adding a little at a time till i get caught up.
August 4, 2016 at 22:00 #41701Participantthanks to all for the kind words and yes i am thrilled that after all this time the end is finally in sight. goal is to be finished for the custom car revival 2017.
August 4, 2016 at 22:14 #41702ParticipantThat looks great! On post 41639 how do you make sure that the roof will flow smoothly into the rear window without a hump or dip?
thank you. sorry i don’t have pictures but really all i did was tape the front edge of some lengths of tig welding rod to the roof in different spots that ran from front to back. then i taped the back ends to the lower rear window. i then raised the filler piece above the rear window up to meet the natural curve of the rod.(hope that makes sense). as far as the roof itself, i started at 4″ then stepped back to look at it and didn’t like the flow so i cut another 1/2″ at a time in the rear till i got what i liked. not even sure how much i took off in the rear just went by how it looked. i really believe that great proportions make or break a chop and think way to many cars are overchopped and my goal was was to have as good as flow as possible. hope that answers your question and thanks again.
August 4, 2016 at 22:56 #41703 Larry PointerParticipant
I’m thinking you nailed it. It sure is true that the eye is the best judge. Shaping and adjusting till that just right loft flows all the way through. You’re right, there is real temptation to go radical with “more is better”, then you can’t go back from overchopped.
August 5, 2016 at 03:53 #41706pkeritParticipantThank you! I have always wondered how that was done. Great job!
August 6, 2016 at 03:52 #41737 TorchieParticipant
Very nice job and great step by step Mike.
So many times people that post on how they chopped a top skip showing a few steps and all of a sudden. Wham. It’s done.
This will be a big help to any one that wants to do it them selves.
TorchieAugust 7, 2016 at 02:26 #41738Participantthanks to everyone for the kind words. one of the next things i did was a dashboard swap. since i pulled out the stock dash to cut the lower a pillars when i did the chop, now was as good a time as any. i’ve always thought the mid ’50’s oldsmobile dashboards were beautiful and after some searching was able to get a ’56 from a junkyard car.
started by just rough fitting the dash to see what needed to be done. i decided to cut the rear mounting edge off the original ford dash for easy mounting and to be able to reuse the stock defroster vents and the windshield trim moulding would still fit correctly. for the rest of the mounting i made a framework of 1″ square tubing to support the dash and allow my steering column to tie into.August 7, 2016 at 02:36 #41739Participantsince the later ’50’s cars had wrap around windshields, the dashboards sat in front of the a pillars. while the earlier cars had flat windshields so the dashboards sat behind the a pillars. this brought the wrap around ends of the dash back into the door area. i wanted to keep the wraparound effect of the dash so i decided to cut the ends off and attach them to the doors. this required making filler pieces before i could start cutting.
then i could cut off the section that was to be attached to the door and cap the end of the dash.August 7, 2016 at 02:42 #41740Participantnext i decided the best way to attach the ends of the dash would be to the window trim moulding instead of the door so if i ever had to remove them, their just screwed in and it would make it easier to paint them.
and then cap the inside end of them.August 7, 2016 at 02:50 #41741Participantall in all, it turned out to be a lot more work than i expected. keeping the gaps even on both sides and top to bottom, tipping the ends down slightly so the wing windows clear when they swing down as they open and leaving enough room under the ends for the upholstered door panels to fit behind. despite all the work i’m thrilled with the results. when you drive your car the 2 things you look at most are the dash and steering wheel so why not go the extra mile and customize them too!
August 8, 2016 at 07:01 #41750Rik HovingKeymasterNice, that looks really great.
Enjoy the beauty of Customizing
-
AuthorPosts
- You must be logged in to reply to this topic.