Barry Mazza 1946 Ford Custom Project
- This topic has 310 replies, 27 voices, and was last updated 4 years, 6 months ago by
 Brian Arcella.
-
AuthorPosts
-
March 23, 2017 at 07:57 #48651
 Rik HovingKeymaster
From Barry…
Phase two…dumbell conversion to Appleton. ..
Enjoy the beauty of Customizing
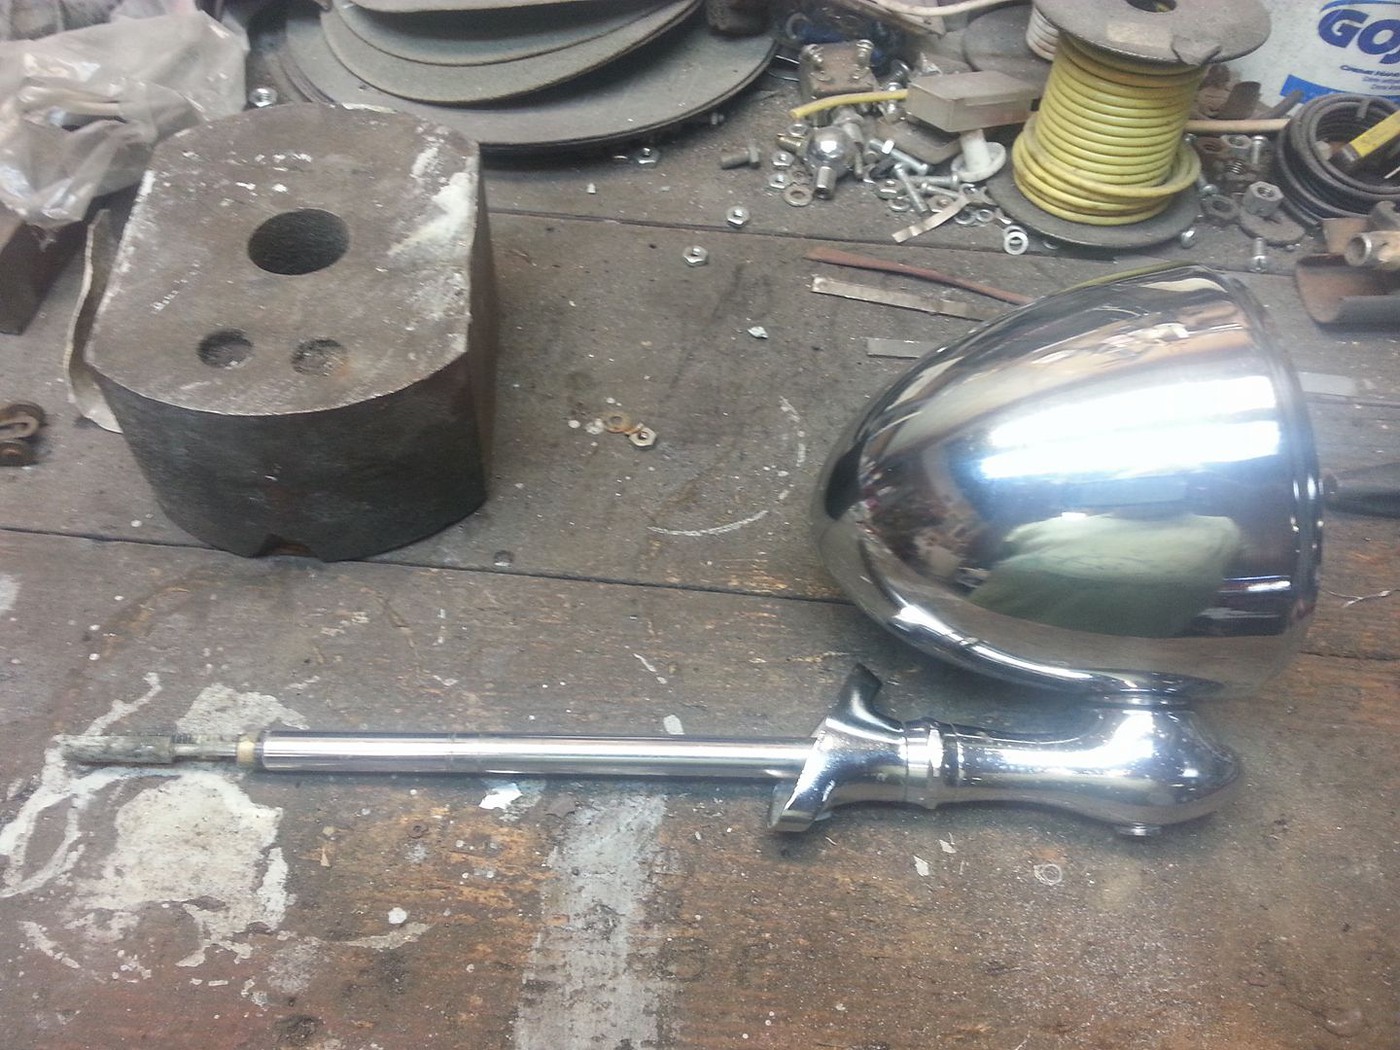
March 24, 2017 at 07:31 #48677Rik HovingKeymasterFrom Barry…
Phase 3…bogus Appleton conversion. ..it looks like real deal at 1/4 of $$$$…..Thanks George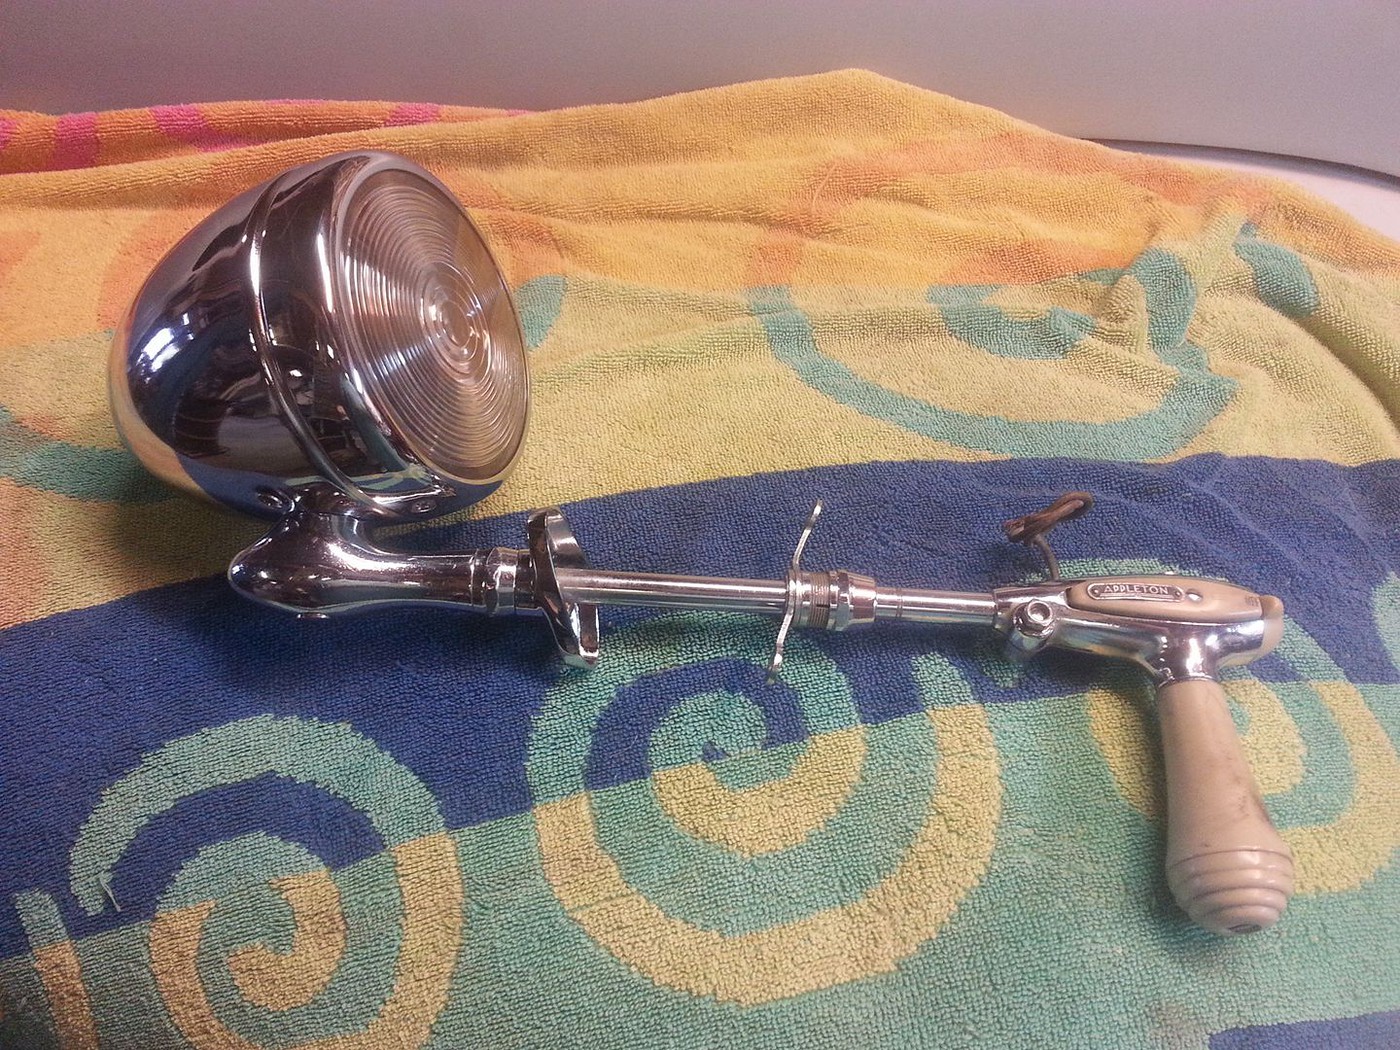
Enjoy the beauty of Customizing
March 24, 2017 at 10:09 #48678 TinwolfParticipant
There was a Appleton model that George Barris and Eastern Auto sold that looks like these Dummys , Ive seen sets for sale but they are rare . I think that Appleton model was the start of those Dummys your using so in a sense that full circle putting those spotlight housings back on Appleton handles , here is a advertisement from Eastern auto and there is a similar advertisement with George Barris ….
And they are cheap toooo , “hurry while they last”
 March 25, 2017 at 06:46 #48684Rik HovingKeymaster
From Barry…
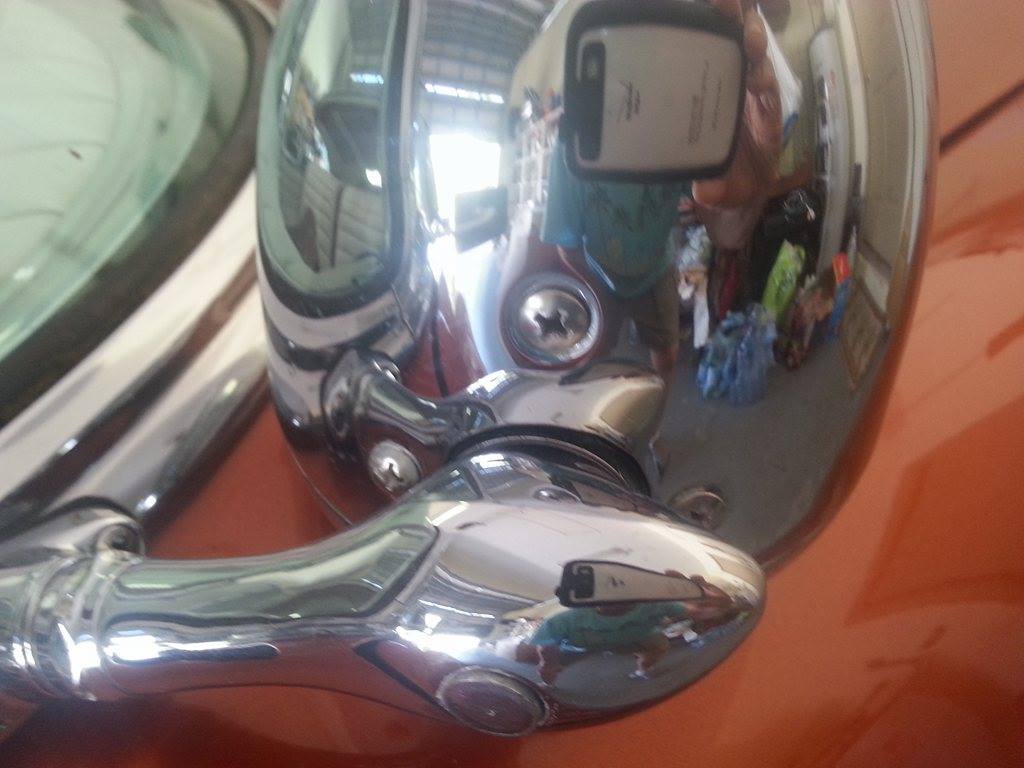
The Barris method of using unpopular Appleton spotlights using dummy shell.
You can make them burn if you have the right light.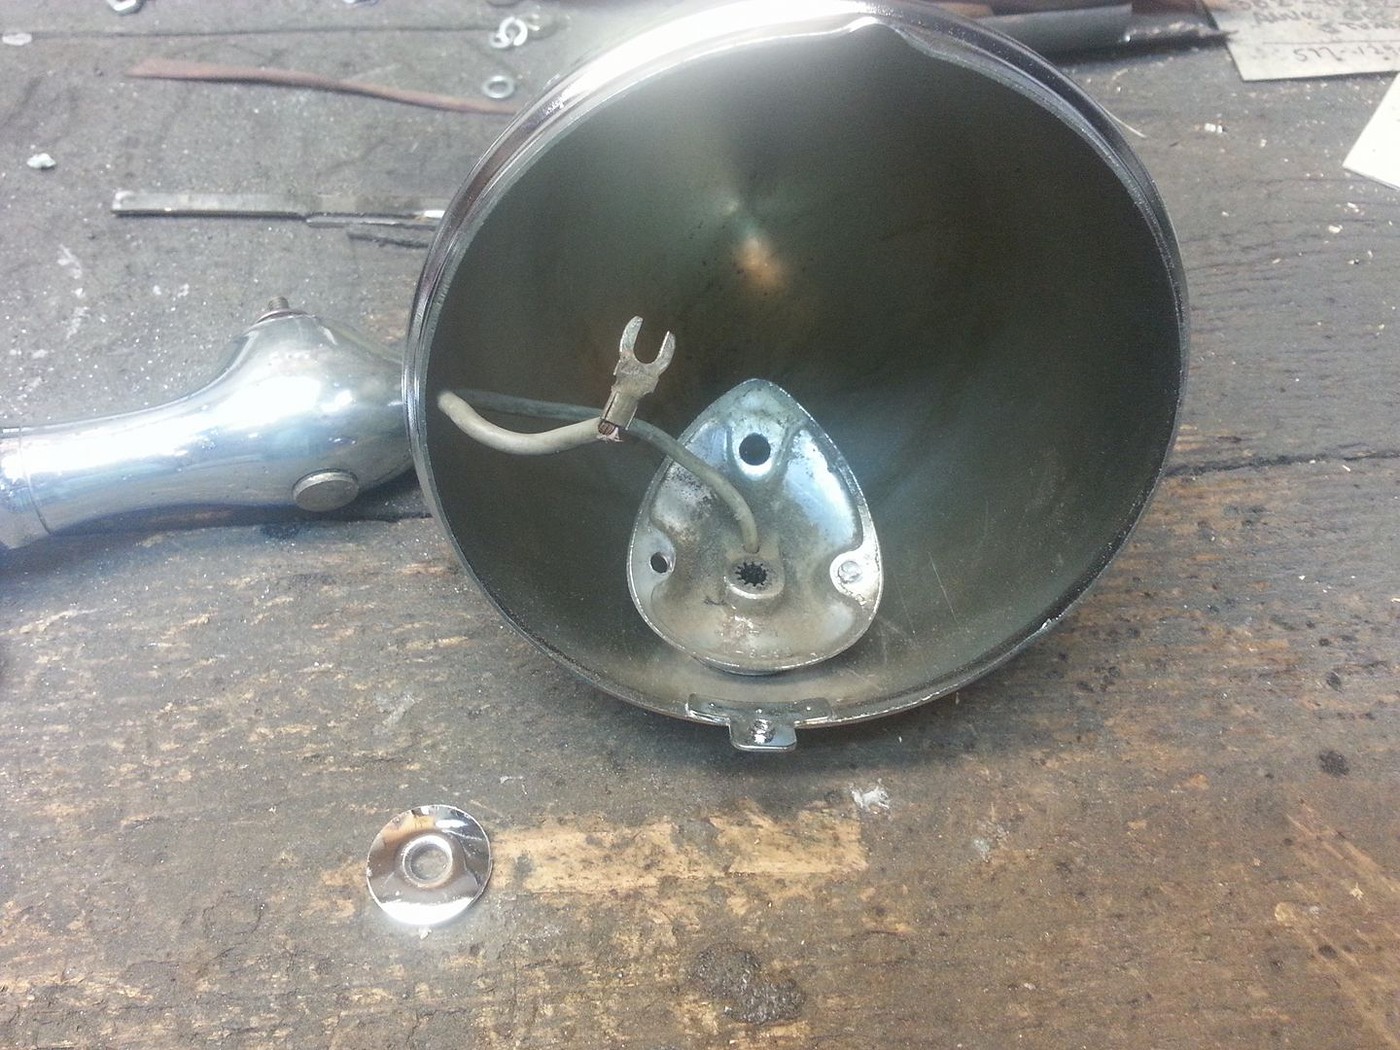
Enjoy the beauty of Customizing
March 25, 2017 at 16:06 #48687 bob tindaleParticipant
I would love to see a article on the process of the conversion to Appleton 112 or 551 from what looks like utility spotlights. How does Barry do this?
March 25, 2017 at 16:14 #48688Rik HovingKeymasterI would love to see a article on the process of the conversion to Appleton 112 or 551 from what looks like utility spotlights. How does Barry do this?
I send Barry a message Bob.. hopefully he can shed some more light on what he did. If he does, I will add it to this post.
Enjoy the beauty of Customizing
March 25, 2017 at 16:47 #48689 David ConradParticipant
Gee, I always thought Appleton 112s were beautiful lights. So much so that over the years I’ve used them on three cars I built for myself and a few for other people.
March 25, 2017 at 17:11 #48690 Dave (a.k.a. rodncustomdreams)Participant
I’m pretty sure Barry feels much the same as you do David. What it appears he is doing is taking what I believe is a service vehicle type spot with a less desirable shape and using the “dummy” spot housing to create the look of the 112 or 551 with all the proper workings (handles, etc.). Pretty clever!
Dave
Jus' creepin' along..
March 26, 2017 at 21:38 #48701 TorchieParticipant
Agreed Dave.
As the availability of the originals goes down and the prices continue to climb there needs to be an acceptable alternative.
Looks like Barry has one.
I believe that the 551’s had the push botton switches didn’t they? Here is a handle pic of a 550 that is for sale near me(sort of).
And The 112’s handles and switches looked like a lot of other Appletons ?
Would love to see a stand alone thread on how he does this as well Rik.
Torchie
Attachments:
You must be logged in to view attached files.March 27, 2017 at 01:22 #48704 Ian GibbonsParticipant
Looks to me like he is taking the part that mounts to the outside of the inexpensive spotlight bucket and is putting it inside the dummy buckets and then is bolting that bracket from the outside of the dummy bucket through two of the original bracket mount holes. He then reattaches that as a unit it to the inexpensive handles.
March 27, 2017 at 01:47 #48705TorchieParticipantLooks to me like he is taking the part that mounts to the outside of the inexpensive spotlight bucket and is putting it inside the dummy buckets and then is bolting that bracket from the outside of the dummy bucket through two of the original bracket mount holes. He then reattaches that as a unit it to the inexpensive handles.
Could be Ian. It doesn’t look like the bucket mounting flange is on the outside of the dummy bucket in the profile Picture with the partial handle on it.
I guess I would try to use the flange to mount the dummy bucket shell. You can get tiny bolts that look like rivet heads.
Torchie
Attachments:
You must be logged in to view attached files.March 27, 2017 at 02:23 #48707Ian GibbonsParticipantLooks to me like he is taking the part that mounts to the outside of the inexpensive spotlight bucket and is putting it inside the dummy buckets and then is bolting that bracket from the outside of the dummy bucket through two of the original bracket mount holes. He then reattaches that as a unit it to the inexpensive handles.
Could be Ian. It doesn’t look like the bucket mounting flange is on the outside of the dummy bucket in the profile Picture with the partial handle on it. I guess I would try to use the flange to mount the dummy bucket shell. You can get tiny bolts that look like rivet heads. Torchie
To me the very last picture Rik posted shows the outside bracket from the cheap spotlight inside the dummy bucket. A brand new bucket with a dirty old mounting bracket inside it that curves way up at the back just like the ones originally on the outside of the spotlight with handles.
March 30, 2017 at 07:41 #48834Rik HovingKeymasterFrom Barry…
The key to Appleton spotlights install…14 ” long drill run in thru fixture held by mounting bracket.
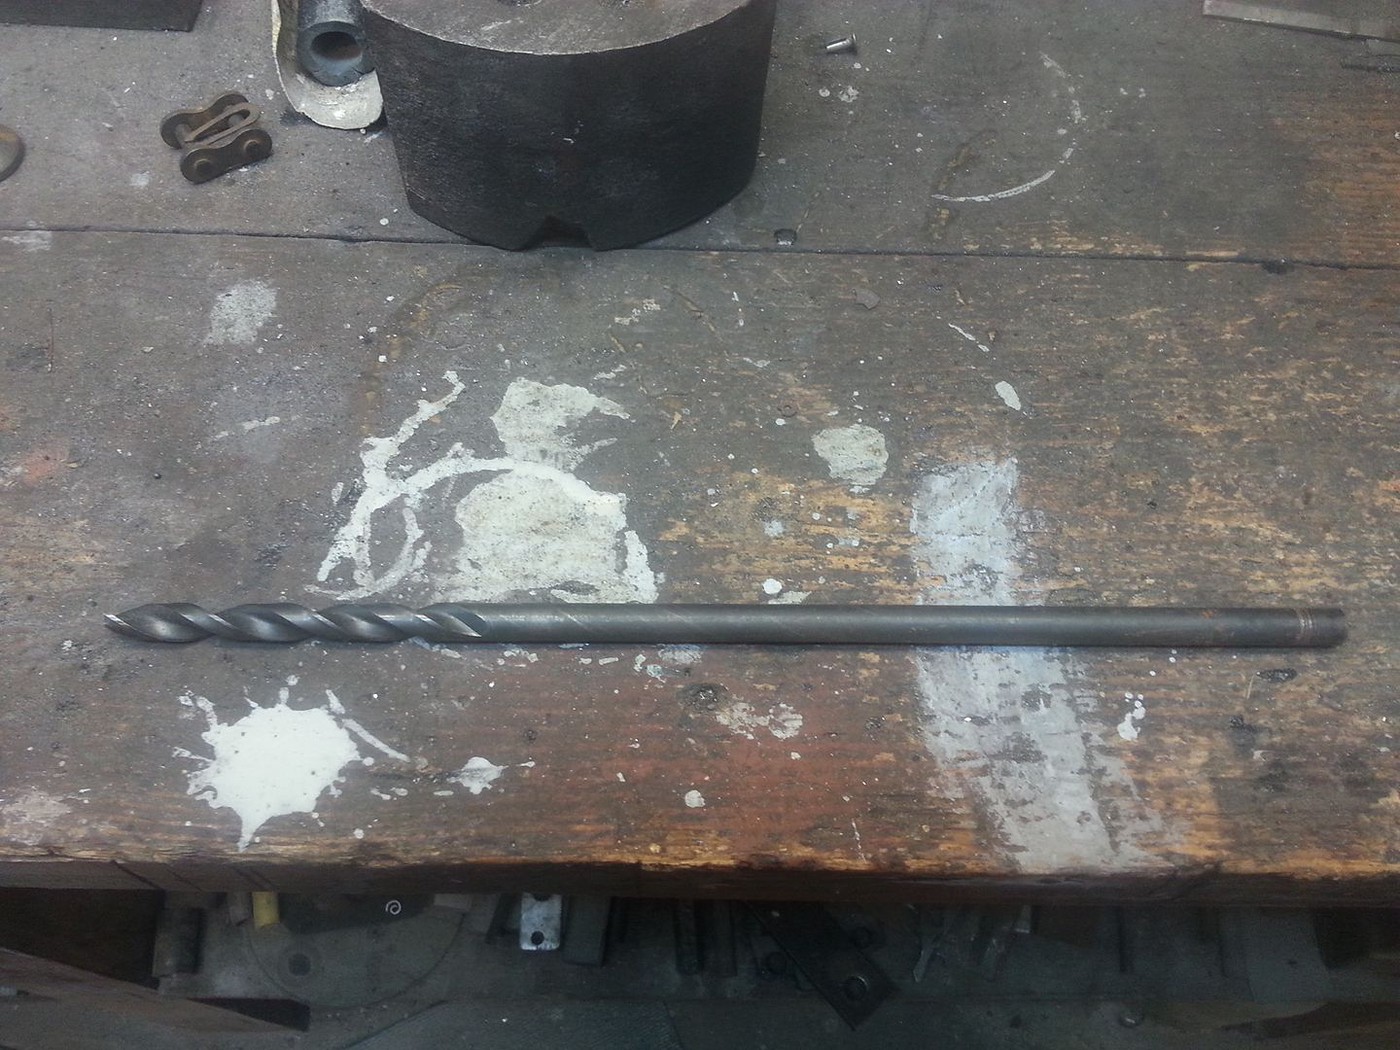
Drill guide in place….ready for the plunge…no guess where your headed.
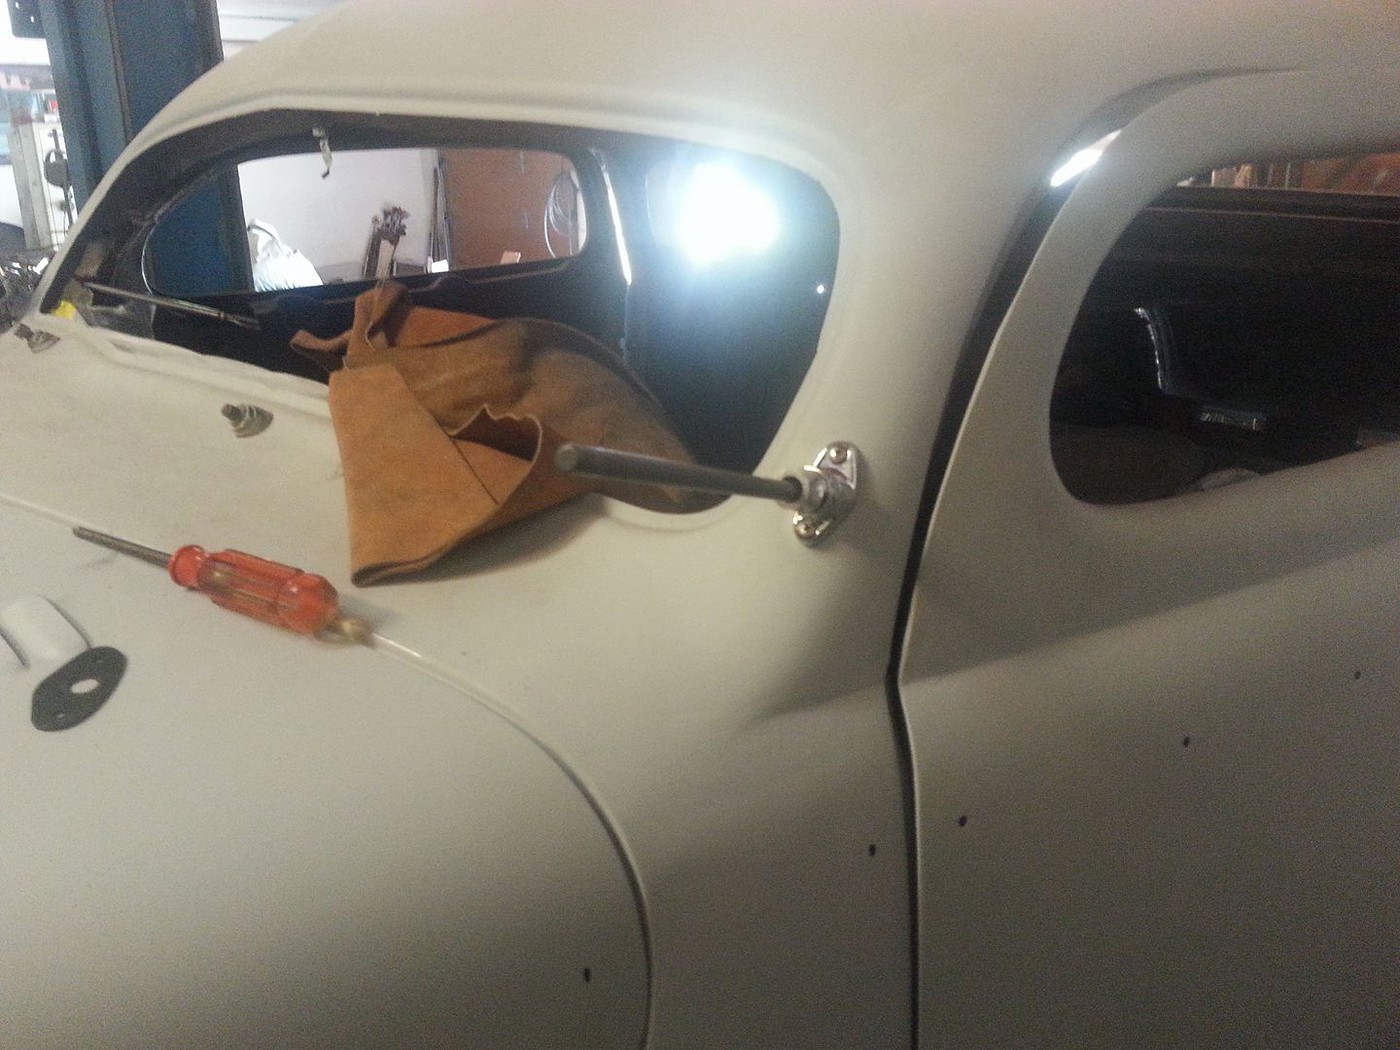
Enjoy the beauty of Customizing
March 31, 2017 at 07:56 #48883Rik HovingKeymasterFrom Barry….
Ok…left APPLETON on..this one has the short shaft for steering wheel clearence…

Enjoy the beauty of Customizing
April 2, 2017 at 11:18 #48960Rik HovingKeymasterOk guys.. I got some more info from barry about how he did the Spotlights.
From Barry….
In the past I had a heard of spotlights… I found that Appleton produced many many variables… some for companies like BF Goodrich and Firestone… and others.
Some had script on the shells others didn’t.One thing for sure… no one (custom car builders) wanted the little shells… so I bought a few just for the handles and inside hardware… Right spot bases were EXTREMELY RARE..they were stamped L and R. (indicating most of these were used on the drivers side only)
Also they had templates you cut out and put on your windshield posts which clearly showed where to drill.
Using template you drilled holes for base mount…then put them on with sheet metal screws.
Then you inserted drill guide in base and drilled rigjt on thru to inside..coming out exact.The rest of the mount was easy…inside brackets on the light handles were secured to dash or garnish molding.
I had to buy a special 14 inch long drill which is slightly longer than the spotlight shaft.Ok heres the spotlight 450…sell cheap…take the light out and unbolt spot shell from shaft.
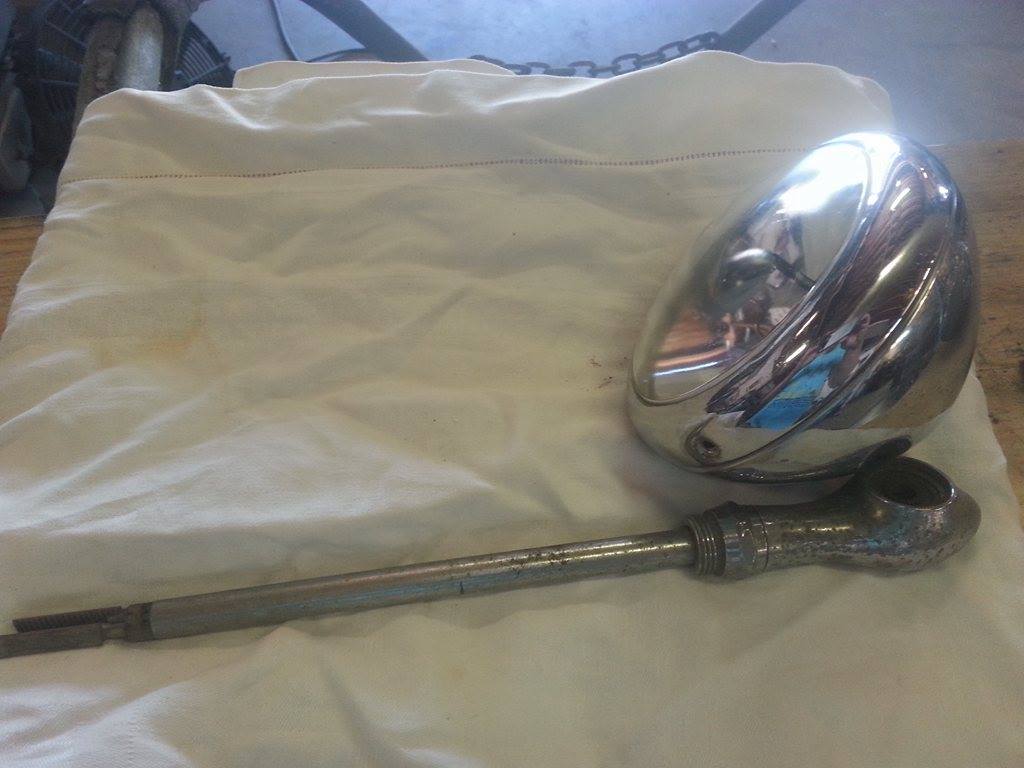
Very carefully… drill out 3 rivets that hold spot on base… then enlarge dummy spot shell so base fits snugly thru…take you time you want it tight.
So now you VERY VERY carefully… install base on inside of dummy shell… 3 holes will need to be drilled to align with base…be sure if you miss its diaster time.
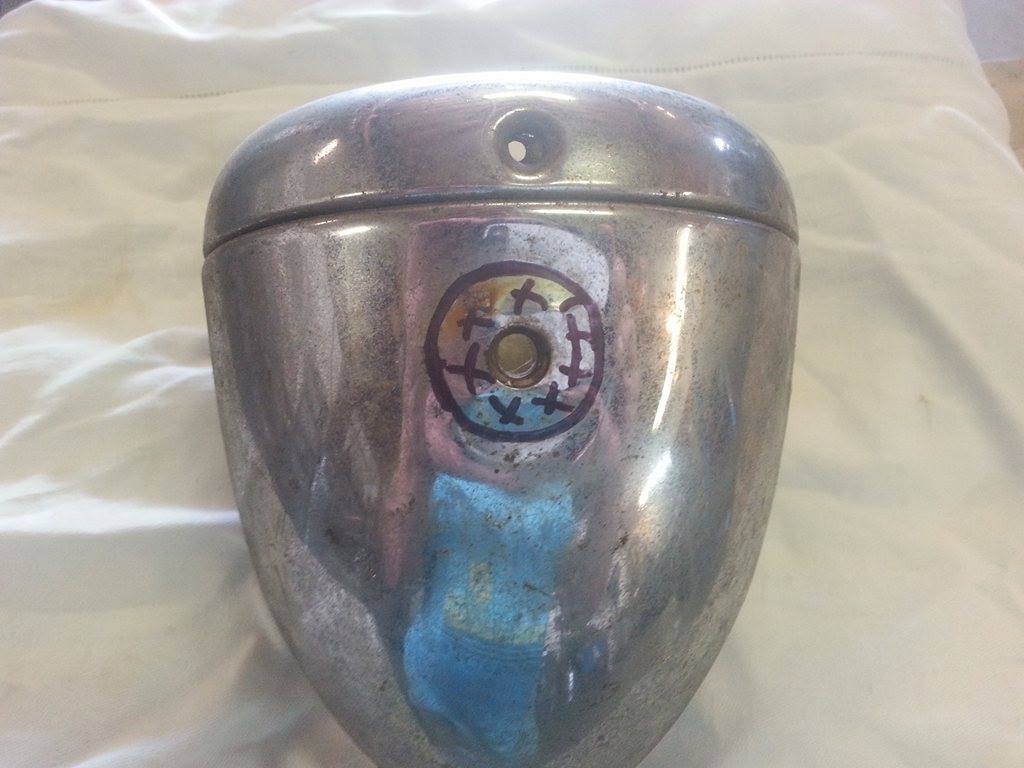
Counter sink your holes and use stainless machine screws to attach the shell to base… looks like this finished one.
Showing a 1950’s dummy shell… I used to have many of them picked up at swap meets… they were heavy metal and stock Appleton light would fit inside… so lights would burn.
They are pretty hard to find nowadays though!
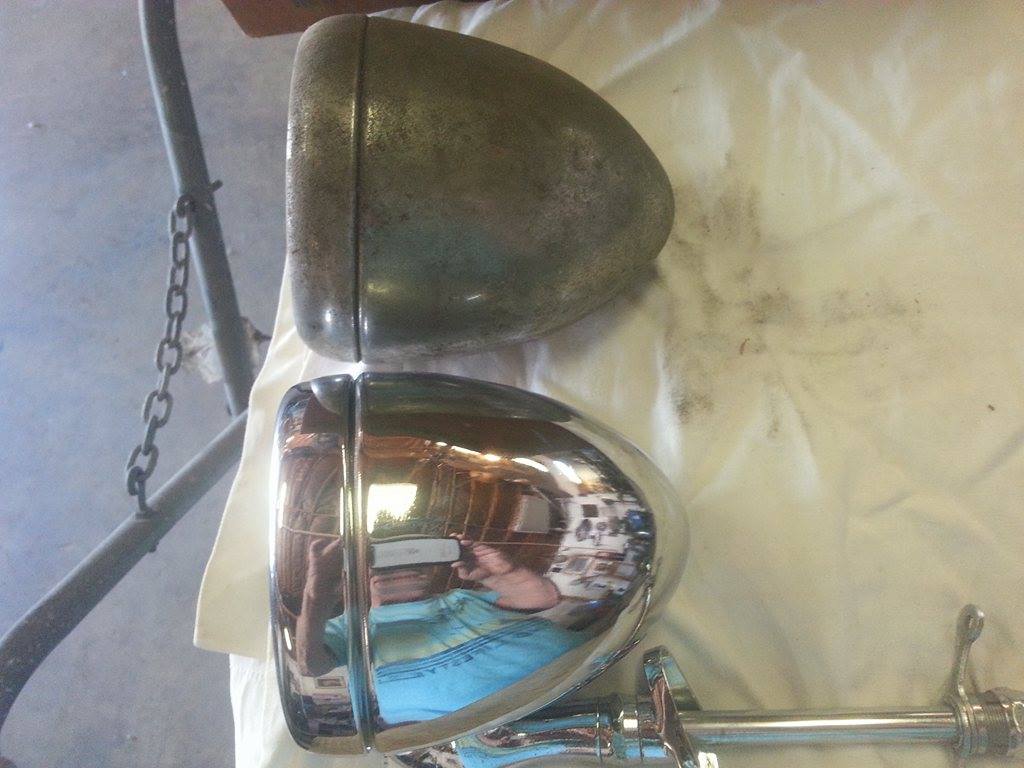
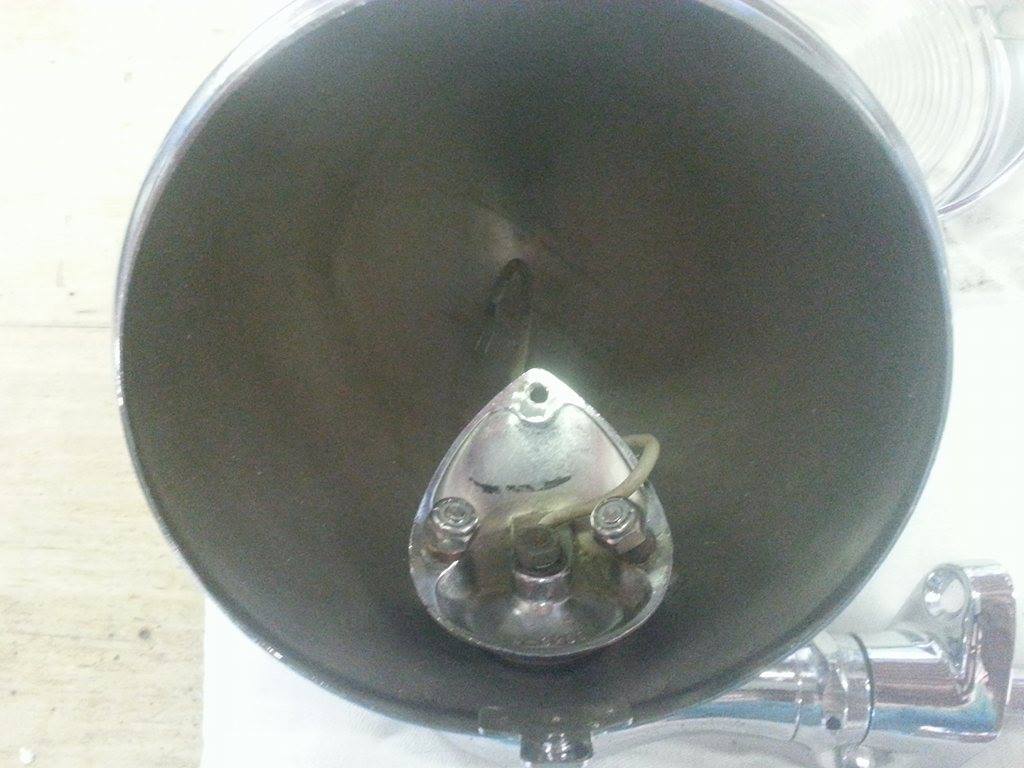
Here’s a pair I just did..BEWARE these new dummys are really crap metal…very easy to distort… so take it easy.
Save some cash doing the lights… I paid under $75.00 for these two.

Enjoy the beauty of Customizing
-
AuthorPosts
- You must be logged in to reply to this topic.