1954 Chevy 210 post custom build
- This topic has 56 replies, 17 voices, and was last updated 3 years, 7 months ago by
Kyle Connole.
-
AuthorPosts
-
May 16, 2017 at 05:55 #50343
Kyle Connole
ParticipantHey guys,
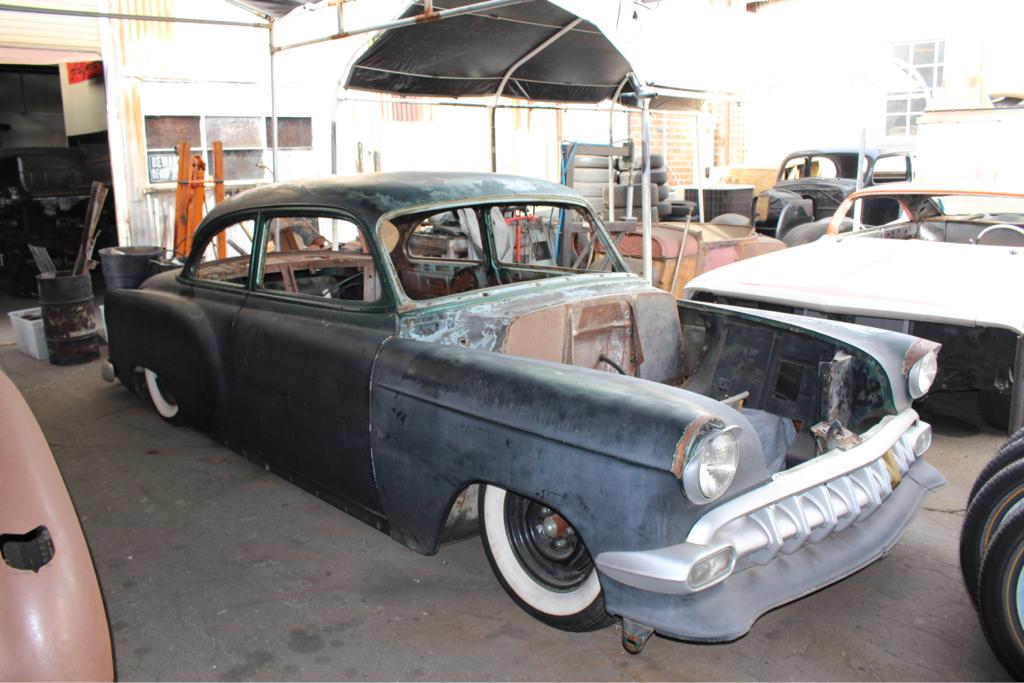
There seemed to be some interest in a thread for my ’54, so this is it! This car used to be my daily driver, and I did most of the work a long time ago before I took it apart. I don’t really have any documentation during that time, So this thread will start after I disassembled most of the car and took it to the shop.
Here is what the car looked like when I got it to the shop.


Then I started taking it apart piece by piece and having the parts acid dipped.
Here are how the fenders came back.


This was the bad door, I already knew about all the rust at the bottom, the other door was solid.


While the front end was being stripped, I brought the engine in and got it mounted.

 May 16, 2017 at 06:02 #50345Participant
After I got the stripped fenders, I began repairing them. I started with the passenger side. It didn’t have any rust, but it did have dents. Some of them show in the above photo. And here is the fender after repairs.


Then I went to the driver side. It had some dents, a poor antenna shaving job that either me or a friend did way back. I can’t remember who did it. And a bit of rust on the bottom. I started with reshaving the antenna. Here is the before.

That photo doesn’t really show how bad it was, here is a better example.

The repair.


 May 16, 2017 at 06:14 #50346Participant
Then I repaired the rust.

This is the first patch I started making, but I wasn’t happy with it and made another. Didn’t get a photo of it though. I’m also getting rid of the rocker trim, so I just made the patch big enough to get rid of the trim hole.


Then the whole body got blasted. While the body was gone, I did some suspension work, but it’s not traditional (sorry guys), so I won’t post that stuff here. I also worked on the trans mount. The body had a couple surprises when it came back, but nothing major.


Then I put the body back on the frame, and started making it look like a car again.


 May 16, 2017 at 06:32 #50347Participant
Next order of business was to start on the ’55 chevy headlights. I mounted the bucket from the inside of the fender, and mounted the bezel on the bucket so it fit well with the headlight. But when I installed it on the car, there was about a 1/4″ gap between the bezel and the fender.

To solve this, I added 1/4″ spacers to the front of the headlight bucket to space it back. I didn’t get a photo of that step, but you’ll see it later. The next issue was that the lower half of the headlight opening on the fender was too big in diameter for the bezel.

So, I made some relief cuts and brought the sides in to match.


Then I moved to the upper half of the headlight and started making the eyebrow section.


I make little tabs so I can cleco the piece on and tack it, then I break the tabs off.

Tacked on

Welded up.
 May 16, 2017 at 06:40 #50348Participant
Then I hammered and dollied, got the weld out, and got it close to shape.


Then I Dykem it and hand sand it to see highs and lows, so I can smooth it out.

And here it is after some smoothing. Still needs a bit more, but it’s close.


Here it is with the bezel reinstalled.

The next thing to do was to finish the relief cuts on the bottom half, and deal with the transition of the eyebrow into the fender bead, and lower half of the headlight opening. Here is what I came up with.

 May 16, 2017 at 07:02 #50349Participant
Next I turned my attention to the hood. I always wanted to one piece the hood, but it took me a while to decide if I wanted to run the hood peak all the way back or fade it out over the bullnose more like stock. I finally decided on the latter. I wanted the hood peak to match the peak on the fenders, and as it turned out, the bead we put in the front fenders of the Mulholland Speedster was the same peak. So I already had dies for the peak for the Pullmax.

So I ran a piece through the machine.

And here is the piece coming together.


So I got the piece clecoed on, then tacked, then made the patch the went the rest of the way down the hood and clecoed that on.


It was at this point that a friend of mine at the shop gave me the idea of making a radius detail at the front of the hood where the peak met the end of the hood. I loved the idea and decided to do it. It took a bit longer to get it right then I expected, but I’m glad I did it. I think it gives it a much more finished look, like it was always supposed to be that way.
 May 16, 2017 at 07:11 #50350Participant
Then I got rid of the holes and welds on the bullnose, welded some more of the peak patch in, and rounded the hood corners.


Then it was at this point that I had to move my car because we were moving the shop, and we didn’t really have the space for my car. I wanted to finish the hood before the move, but didn’t have the chance. So I had to bolt the front end back together, and I loaded it up.

I brought the car to my parents house where I’ll continue to work on it. Here is the front end after bolting it together for the move. It’s not aligned and obviously needs more work, but you get the idea. I’m pretty happy with how it’s coming together.

And that brings us up to present. I haven’t had the chance to get back on the car for a bit. I plan to finish the hood, and then probably won’t post for a while because I’m going to take the body off and finish the suspension work. Once that is done, I’ll put the body back on and align everything proper, then finish the fender side of rounding the hood, and do some other sheetmetal before getting it back on the road.
May 16, 2017 at 08:06 #50351 TonyParticipant
I really like the way you did the headlights.
May 16, 2017 at 10:50 #50352 Quentin HallParticipant
Very impressive work Kyle. I suspect we all might learn a thing or two from watching you work. Glad you have come on board. Looking forward to see anything you put up.
May 16, 2017 at 16:47 #50357 TorchieParticipant
All of the above !
Looking forward to more posts.
Torchie
May 16, 2017 at 16:58 #50358 Mats OlssonParticipant
Nice work!
May 16, 2017 at 17:59 #50359 TinwolfParticipant
Standing ovation , beautiful sheet metal work !
I have a similar problem delete the center part of my hood (-41 Cadillac) but just cutting the two folds and replace with a flat piece of sheetmetal I think will weaken the hood which is very flat in that area , I have not yet made the cut but made a pre folded and MIG welded (yes it warped , but for each row of tacks I corrected it with the shrinker on the folded edge) piece that I will TIG / hammerweld into place , just a thought !
Wolf
May 16, 2017 at 18:03 #50360 KingKustomsParticipant
Nice work! The head light treatment works well on the ’54 body..
Robert A. Radcliffe III
King KustomsMay 16, 2017 at 21:30 #50365 Ian GibbonsParticipant
Nice work Kyle. I have been following this on the HAMB nice to see you post here as well. I don’t want to speak for Rik but I don’t think there would be a huge issue with posting the suspension work on here although traditionally based I don’t think it is quite as strictly enforced as the HAMB.
May 17, 2017 at 07:06 #50368ParticipantThanks for the kind words guys! I’ll try to keep busy with the car so it isn’t too long between updates. I have the car sickness bad, so I’m currently splitting my time between this car and a model T roadster. Hoping to make good progress on both very soon.
Tinwolf, that is an interesting thought. I think my hood will be alright, but if not, I’ll cross that bridge when I get there.
Ian, wether it’s true or not, I feel like the HAMB is a little more “traditionally styled” based, and here is more connected to the history and therefore feels like a much more traditional board. And I respect that. If Rik doesn’t mind, and anyone wants to see, I’ll post frame stuff, but more likely just finished photos, and not a bunch of the progress like I’ll do with the sheetmetal work.
-
AuthorPosts
- You must be logged in to reply to this topic.