36 3w kustom build
- This topic has 234 replies, 37 voices, and was last updated 6 years, 9 months ago by
 kustomland.
-
AuthorPosts
-
December 31, 2015 at 02:03 #33388
 Janne KutjaParticipant
We’ll see what’s next Custom car t-shirt. I’m not sure if there going to be ’36 Ford this year. 🙂
Kenneth: Great work as usual!
Now on Instagram! https://www.instagram.com/kutjadesign/
December 31, 2015 at 06:16 #33390 kustomlandParticipant
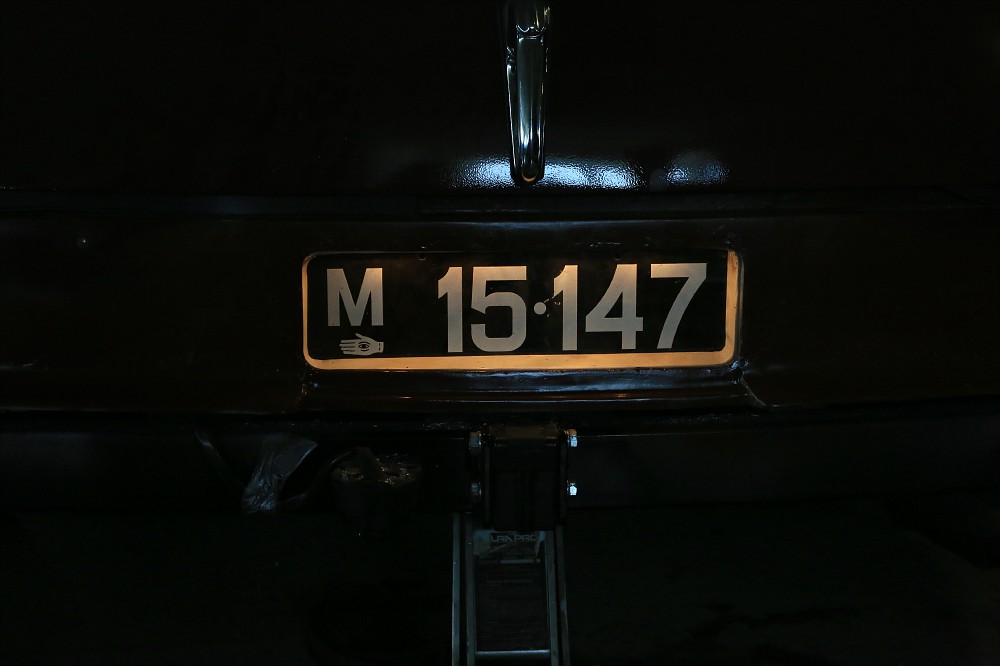
Hey Kenneth… That licence plate frame you made is too clean….LOL…. You should see how they did it on the 1939 Merc That Kevin Sledge had… It looked like some one shoot it with a buck shot shot gun and got one of those “FREDS ” Fu#king / Re- dickulas / Eating / Device the army used in WW2 to open the hole up with….
Clean work Kenneth……… love it……..
And get some chalk and write Barris on the tin before you pint it so in like 30 years it will show through….lol
KUSTOMLANDJanuary 2, 2016 at 09:52 #33453 Kenneth KristianssonParticipant
Hey Kenneth… That licence plate frame you made is too clean….LOL…. You should see how they did it on the 1939 Merc That Kevin Sledge had… It looked like some one shoot it with a buck shot shot gun and got one of those “FREDS ” Fu#king / Re- dickulas / Eating / Device the army used in WW2 to open the hole up with….
Clean work Kenneth……… love it……..
And get some chalk and write Barris on the tin before you pint it so in like 30 years it will show through….lol
KUSTOMLANDEven though I try to build as traditional as possible there is a limit on how close to traditional I will go…lol
Don´t you think it will be kind of cheating using Barris name. I do….lol
January 2, 2016 at 10:45 #33454 AndreasParticipant
Super good idea with the wheel-dollies on a pedistal! think i steel that idea!
The sunken licence surround looks perfect, Where are you planning to fill gas?
January 2, 2016 at 13:35 #33455Kenneth KristianssonParticipantYou are very welcome Andreas. Actually I borrowed the idea from Leif Tufvesson and it works perfect for older stiff bodies..haha.
As for the gas filler I first had an idea of making a device to push the licence plate up inside the body and hide the gas cap behind but to get a good angle on the filler tube the licence plate would end up to high and that disturbed the look for me so I will make a filler tube inside the trunk instead.I will do it the same way as on the Merc with a bigger tube with a tight cap outside of the fillertube to keeping the fumes not to go in the car. That means I have to open two caps when filling but I don´t think that´s a problem.
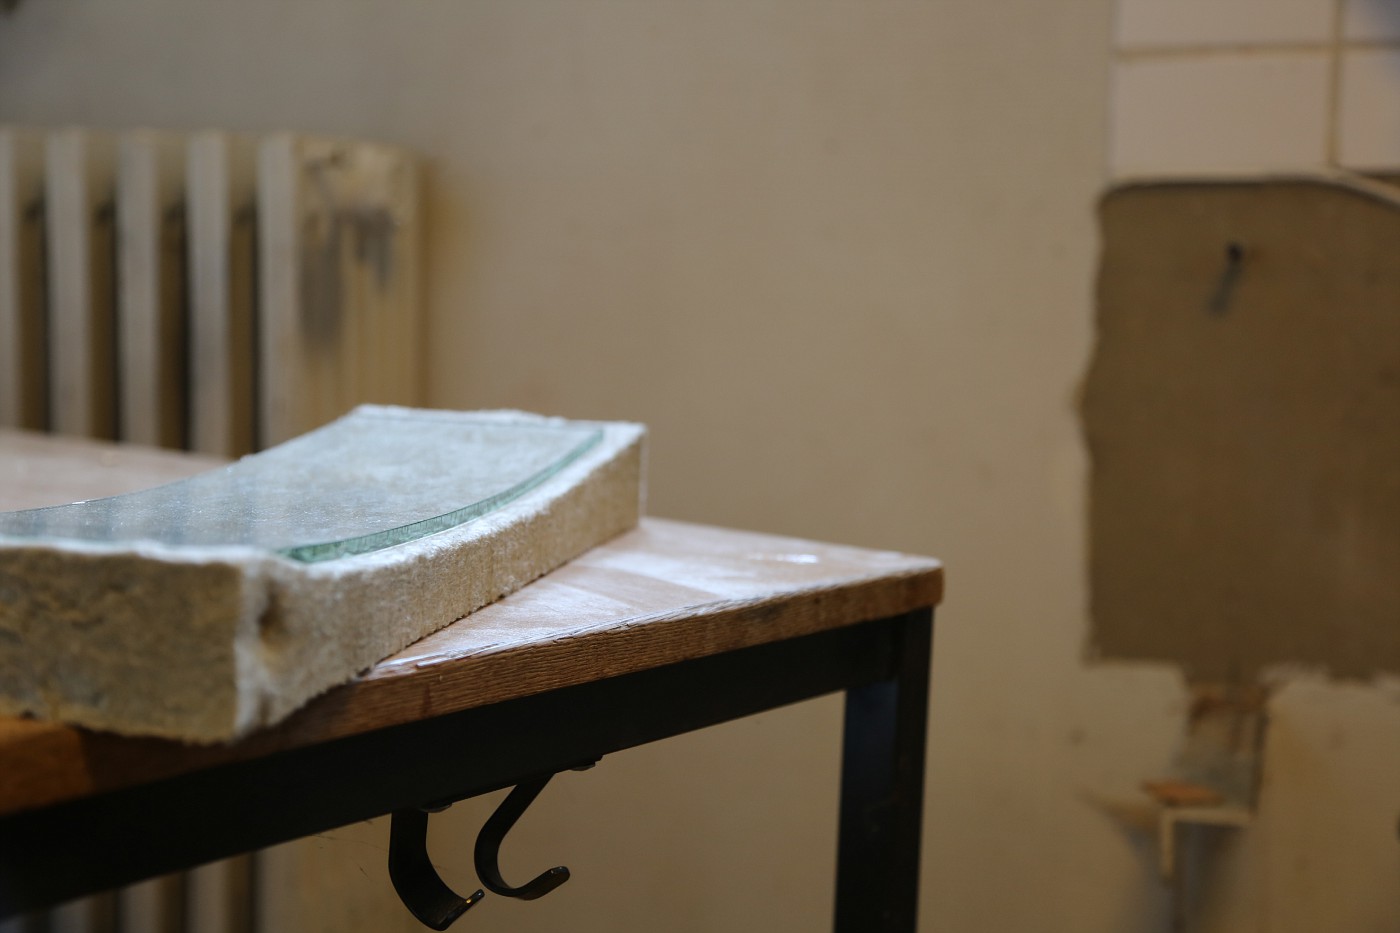
January 3, 2016 at 20:38 #33522Kenneth KristianssonParticipantHere´s the box for the licence plate. Pluggwelded some small mounting tabs to it and made an inner frame for the glass to lay on and pluggwelded that as well. Made some simple mounting brackets with cage nuts on the backside and will plugg weld them from inside of the rear panel.Now I only have to make the glass. It will have a slight crowning to it and need to be heated for shaping. Maybe I will have to talk to Palle and ask if I can come over and bake with him…hehe.


 January 4, 2016 at 06:23 #33534
 Rik HovingKeymaster
Looks amazing Kenneth.
The shape and round edges of the opening are just perfect.Hope you can do the slightly curved glass as well.. that looks so good on Palle’s 1947 Caddy.
Enjoy the beauty of Customizing
January 4, 2016 at 15:09 #33536 J.B.Participant
Great work, as usual. I think, it would have looked so much better with an old California plate there. On my cars, I always use magnetos glued to the back of my Swedish plate and then remove it easily when I park. But with an encapsulated plate it will be harder. Maybe your Swedish one with magnetos on the bumper when driving and then taken off when parked. 🙂
I am about to fix my gas filler in the trunk this winter and I was thinking in the same line as you with an outer sealed off tube, but I was overthinking, I think. I saw on the Hirohata Mercury that they sealed off the filler tube with a simple rubber and then took a non ventilated cap and simply put a hose for the fumes and led it back out.
Attachments:
You must be logged in to view attached files.January 4, 2016 at 16:52 #33539Kenneth KristianssonParticipantGreat work, as usual. I think, it would have looked so much better with an old California plate there. On my cars, I always use magnetos glued to the back of my Swedish plate and then remove it easily when I park. But with an encapsulated plate it will be harder. Maybe your Swedish one with magnetos on the bumper when driving and then taken off when parked.

I am about to fix my gas filler in the trunk this winter and I was thinking in the same line as you with an outer sealed off tube, but I was overthinking, I think. I saw on the Hirohata Mercury that they sealed off the filler tube with a simple rubber and then took a non ventilated cap and simply put a hose for the fumes and led it back out.
Thanks JB.First I thought of that thing with the plate as you says but then I was thinking since we are living and driving in Sweden I wanted to adapt the car to Swedish standards.Maybe not qiute traditional but….
About the gas filler tube it sure works the way it´s made on Hirohata Merc but if you over fill the gas ends up in the trunk and soiling the carpet. With an outer tube there´s no risk of that happeningJanuary 4, 2016 at 23:44 #33542J.B.ParticipantAbout the gas filler tube it sure works the way it´s made on Hirohata Merc but if you over fill the gas ends up in the trunk and soiling the carpet. With an outer tube there´s no risk of that happening
Yes, that is true. 🙂 I’ll see where I end up. Love to see the progress on your great car!
January 4, 2016 at 23:48 #33543Janne KutjaParticipantI remember one OSW trip when one guys clothes and sleeping bag were covered with gasoline, and that wasn’t me (luckily) 🙂
Now on Instagram! https://www.instagram.com/kutjadesign/
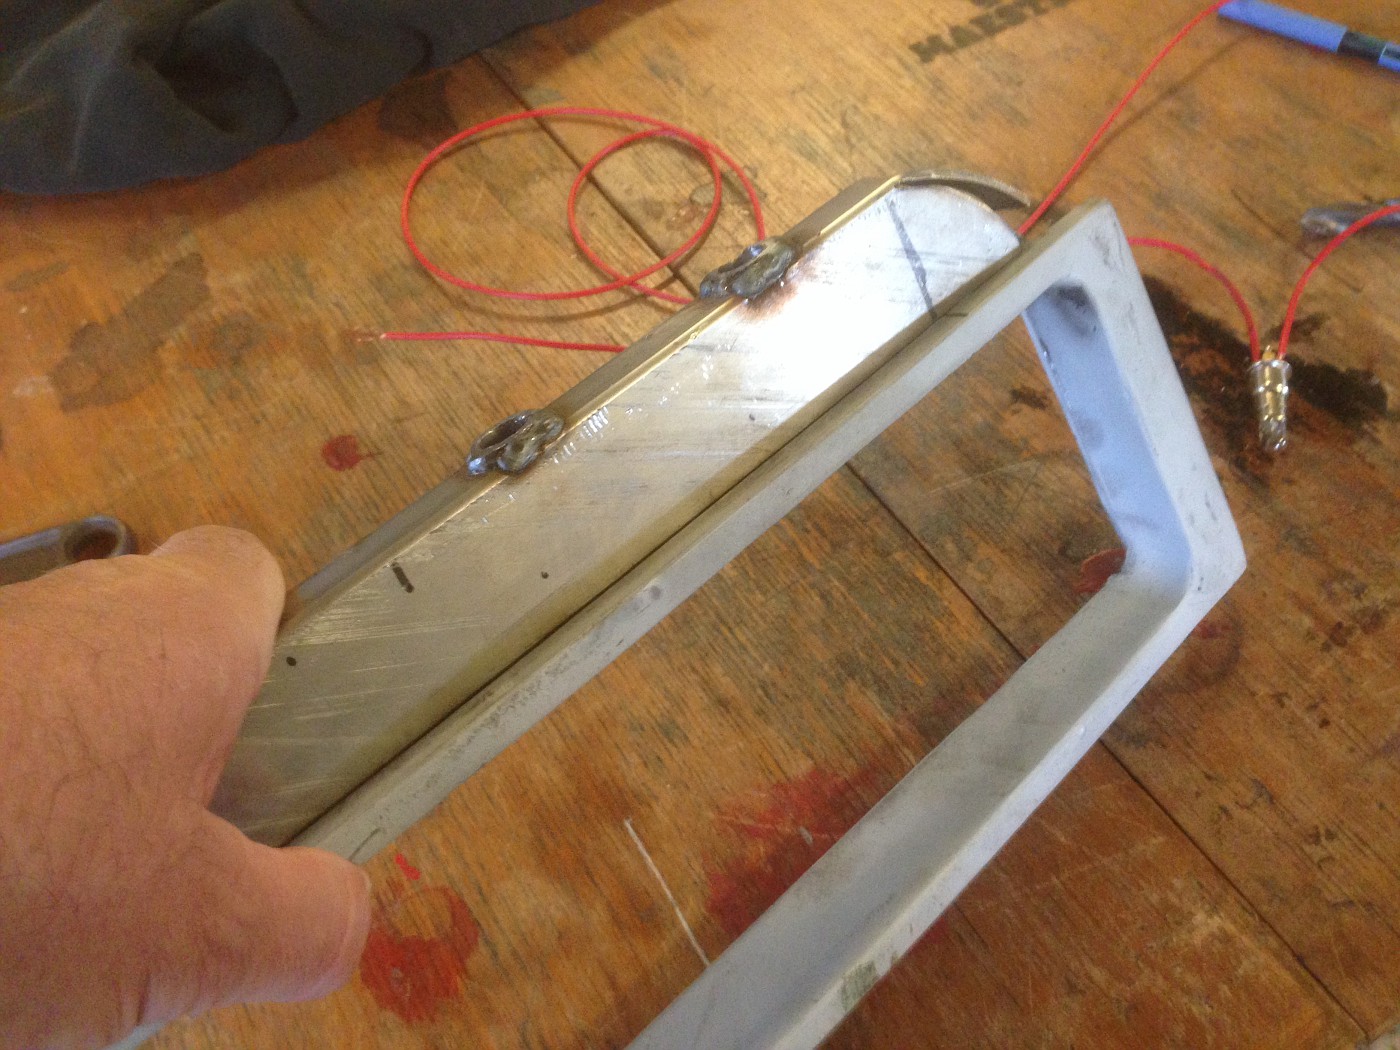
January 6, 2016 at 19:13 #33600Kenneth KristianssonParticipantWell. The day after I was done with the licenceplate holder I realized I´ve made a hughe misstake.Welding mountingbrackets directly against the body skin is a big NoNo and I also got notified about it by Wolf. By doing that there´s a risk the paint will crack and maybe even worse the body panel will crack around the welds. Dont know what to hell I was thinking but it´s done and only one thing to do about it. Redo it and do it right.I also needed to replace the stock bracing sitting behind the panel wich the spare tire holder is mounted to since it was cut out to make space for the licenceplate so I thought of combine the two things. Made two bracings ( one left and one right) reaching from bottom of the tool tray up to the bracing under the trunk opening.

Made some small mountings and welded them to the bracings. These are upper mounts for the licenceplate holder.

Then I made a crossmember to go between the two bracings for the lower mount.

Mocked up for the last time before welding. Will also make an upper crossmember to stiffen up the area where the trunk latch will be attached to later.Also will drill three to four holes on top of the plate holder for light bulbs. Don´t have the sockets yet therefore I´ll wait doing that. No need to do everything twice..hehe
 January 7, 2016 at 01:08 #33606
 Quentin HallParticipant
Doing it twice . . . makes it twice as good.
January 7, 2016 at 08:50 #33612J.B.ParticipantBetter to do it the right way and don’t be sorry later. But the feeling when you have done a big job, stand back and then comes up with that you have to start over…. not fun… Looking good, as always!
January 8, 2016 at 20:41 #33680 PalleJParticipant
fantastic work Kenneth…and you are more than welcome to come over, and we can fabricate the glass while drinking a cold beer. if you dont have the time for it, just email me a drawing of the glass, and i will bend one for you.
about the light bulps…i had to cut mine off, and weld a kind of a bar over the plate, because the light where visible at nights when the bulps where sitting low. you cant see where the light comes from now..so just make sure you dont make the same mistake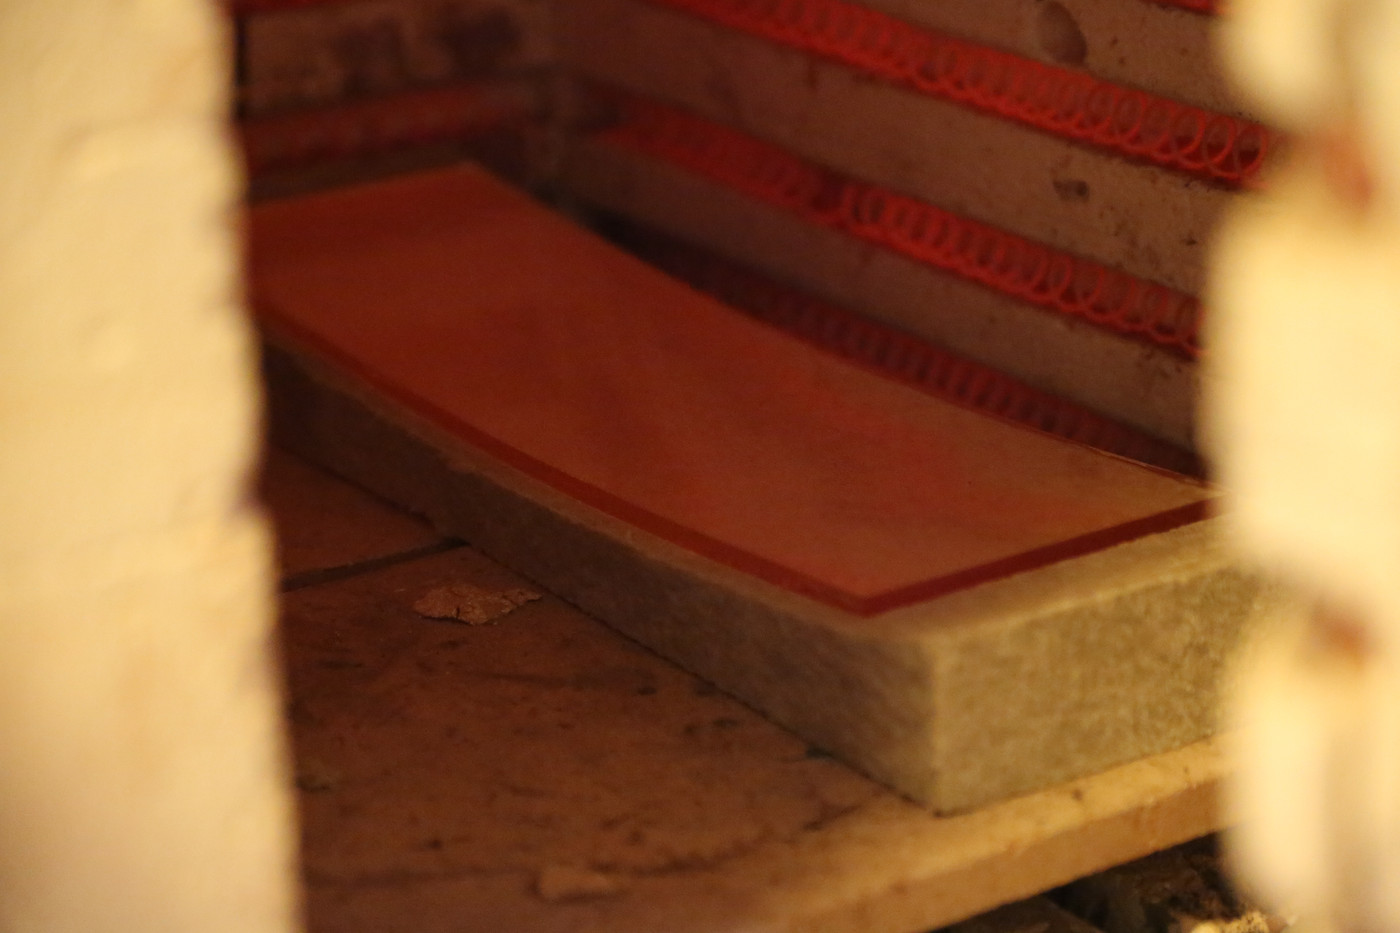
-
AuthorPosts
- You must be logged in to reply to this topic.