Digital Restyling Tony Miller 40 Ford
RESTYLING TONY MILLER 40 FORD
Well thought out designing, planning, Digital Restyling and construction, resulted in Tony Miller’s breathtaking 1940 Ford convertible. And the car is not even finished yet!
In October 2008 Tony Miller contacted me about a new project he was planning for some time. It was going to be his ultimate dream convertible based on a 1940 Ford. The time was right, and the planning stages would soon move into actual production stages. But before the actual 1940 Ford would be delivered to Don Dillard‘s Highway 99 Hot Rod shop, quite a few details needed to be sorted out. Tony asked me to help him with the fine details, figuring out some measurements and create and inspiration visual for both Tony as well as for Don who would build the car.
Tony Miller has been building several cars over the past few decades, and all of them have been rather subtle with a lot of attention to small details and a mix of parts. Tony seems to pick the best looking part from the model years surrounding the car he is building. Creating phantom models that have a lot of people scratching their head. For this 1940 Project these same ideas will still apply, but overall this car will have a lot more body work and customizing going on than any of Tony’s previous cars. We are talking about sectioning, chopping and reshaping.
When Tony started his project he contacted John Vernon for some initial visuals, which helped Tony a lot getting the rest of the project planned. Tony sent me an long email with ideas for the car including the original visuals by John.

 John Vernon created the initial Photoshopped visual for Tony. Sectioned body, with a mild chop and 46-48 style looking top and window frames. The top photo shows where John based it on. The original image showed that Tony wanted to move the front wheels and openings forward with an inch and a half for better proportions.
[divider]
[box_light]
Hello Rik,
I think you’re aware that Don Dillard will be starting a project for me shortly. The starting point is a ’40 Standard coupe, and Don will be sectioning it a little and replacing the coupe roof with a Carson top, adding quarter windows like a postwar Ford convert. I think your Photoshop skills may be able to help us with some of the decisions; I’ll give you some of the background and you can let me know if you’re interested.
The car I bought is a Standard. Don strongly favors the DeLuxe front end; I have always preferred it too, although in recent years I’ve come to like the Standard hood and grille equally as well. Of course the DeLuxe is very sheer and straight lined, while the Standard is more curvaceous and has a prow like a boat. I have not yet made up my mind which to pursue; among the considerations are that I already own a Standard hood, and I have a little concern about the design line on the side of the DeLuxe hood crowding the stainless trim after it’s been sectioned. More about that in a minute.
The second issue concerns the grille, regardless of DeLuxe or Standard. Don and I are in agreement that most sectioned ’40s are least successful in the grille area, because as the top of the hood is lowered toward the headlights, the mouth becomes too large for the face.
What Don and I have discussed is this: When sectioning the hood, to step the cut at the trailing edge of the grille, so that more of the stock nose is preserved, and to remove an amount equal to the section (or maybe half that) from the height of the grille. That is, the hood/grille joint is moved down an inch or two relative to the position of the headlights. Our hope is that the nice proportions of the stock front end is thus restored.
So, my request of you is this: try both the Standard and DeLuxe front ends on the same sectioned body, and adjust the hood/grille joint downward until the proportions look right. If you’re able to tell us the approximate dimension of that adjustment, so much the better. I will be using a bumper; feel free to place it where it looks best to you.
Here’s where we think we’re going. This represents about a 2″ section, a slight chop to make the side windows the same height as a ’40 convert, and a Carson top made to look like a folding top from a ’42-’48 Ford Convert (also a little lower than stock). The front wheels and wheel wells have been moved forward about 2″, and the wheel wells have been radiused to match the chosen tire sizes:
I think that a front 3/4 view would illustrate the options best.
The questions, then, are: Would you like to play?
Many thanks
Tony Miller
[/box_light]
Digital Restyling Tony Miller 40 Ford
I have always been very impressed with Tony’s cars, so I was very happy he approached me to help him out with his new project. I emailed him back I was IN and started thinking about the project. I started searching for the best photos to use and figured it would be best to start with a dead on front view of a 1940 Ford standard to figure out the best amount of sectioning. I could not find a dead on front view of a convertible, but in this stage that was not really important. We used the size of the side trim to figure out the amount to section the car.
 The first images I did showed a dead on front view to figure out the amount the hood needed to be sectioned and how much less the grille should be sectioned to keep the right balance. I have added three lines to show what I did in these photos. Line A shows how the height was reduced after the main body was sectioned. Line B is located at the top of the side trim on the stock location and shows how much the trim has dropped. Line C shows how much the grille height was reduced after the sectioning of the hood.
[divider]
 Next up was an new version of the side view with a more sectioned body, and reshaped/raised wheel openings to get the car lower to the ground and still have a nice space around the tires.
[divider]
 At the time I had a hard time finding a good 3/4 front view photo of a 1940 Ford Convertible. I ended up using this rainy picture because the angle of the car was as good as perfect for our needs.
[divider]
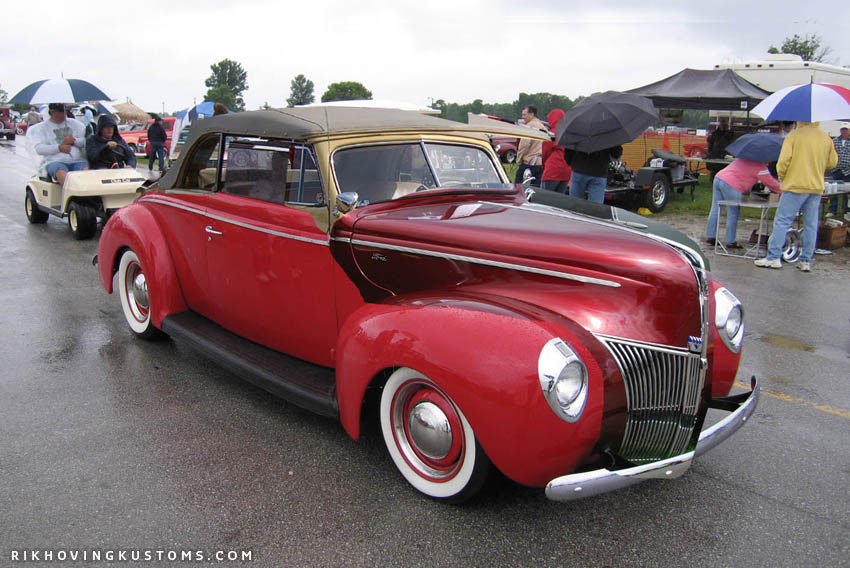 Since Tony wanted to see both the DeLuxe and the Standard hood and grille options I found an photo of a Standard at about the same angle and copied the hood and grille parts of that photo. I also copied a 1948 Ford convertible cowl, windshield and top from another photo and pasted in my base photo. At this time the main body has already been sectioned hence the ill fitting standard hood.
[divider]
 The 1940 Ford DeLuxe with the stock height 1948 Ford windshield. The body and hood have been sectioned and the “soft” top reshaped to look more like the side view that was done previously. The overall look is very subtile.
[divider]
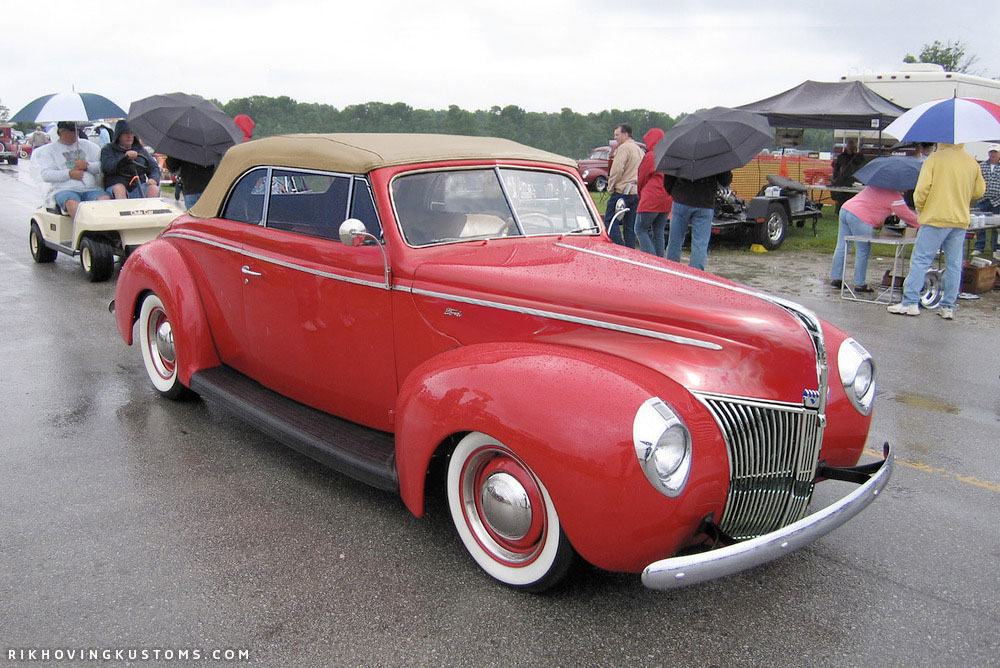 This image is the same as above, only now with the standard hood and grille grafted on.
[divider]
 Next up was a version with a slightly chopped windshield for the Standard version.
[divider]
 I did the same for the DeLuxe version, and changed the background to make the car stand out better. The first color choice was a dark gray with orange steel wheels with stock hubcaps and beauty rings.
[divider]
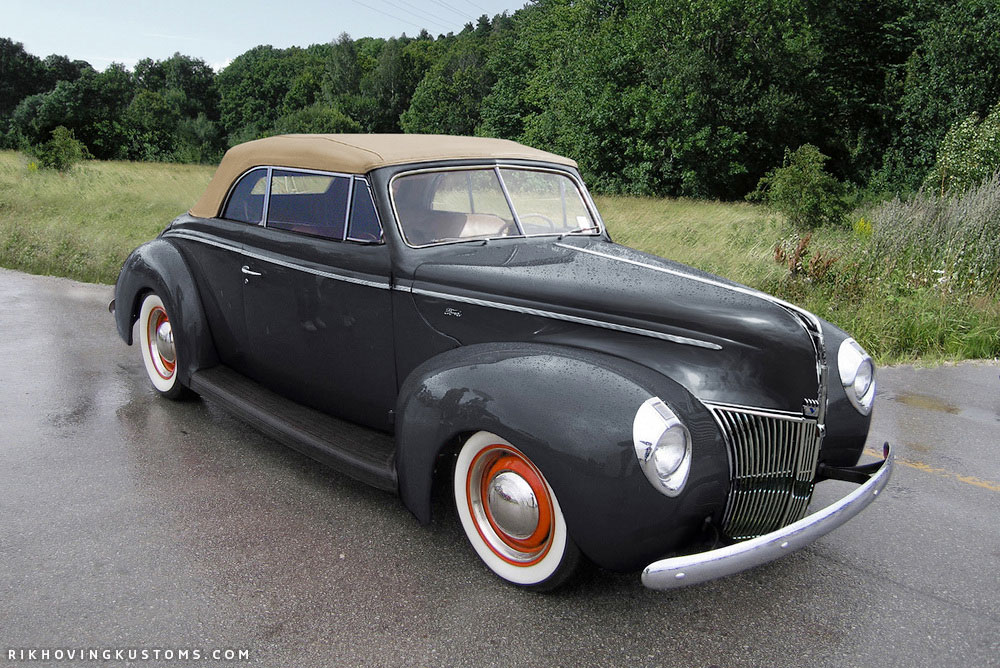 I did the same thing for the Standard version. Tony liked the chopped windshield, but not so much the lower side window openings. This was changed in the final image I did a bit later.
[divider]
When the side view and front 3/4 view of Tony’s dream convertible were at this stage Tony felt confident to start the actual build of the project. Tony delivered the 1940 Ford coupe and all the parts needed for the project to Don Dillard’s Highway 99 Hot Rods show. Don had followed the discussions Tony and I have had about the car and with the printed visuals handy Don started the project. The first order was to get the frame done with all new suspension setting the frame at the perfect ride height. Installing the engine and then place the coupe body back onto the frame. Now it was time for the fun stuff. Section the body, reshape the wheel openings an cut off the top to create an convertible body. Tony decided to go for the Standard hood and grille, just because they made the car look a bit tougher.

In progress photos from Don Dillard’s Highway 99 Hot Rod shop. The first image, top left, shows the starting stages of the project. The top right shows the freshly sectioned body sitting on the completed frame. The hood is being sectioned at this moment. Lower left shows the car with the top cut off, the longer sedan doors installed and cardboard templates in place to get the right shapes for the placing of the windshield and side window frames. The lower right photo shows how Don completely had to reshape the 1951 Ford windshield. He ended up hand shaping most of it.
[divider]
During the real progress of the car Tony always kept me posted on the project and from time to time I stepped in to visualize some of the steps. This way a lot of time could be saved and new decisions could be made to solve problems that could not have been foreseen in an earlier stage. When the coupe body was roughly sectioned and all the parts were place back on the frame the car looked really attractive. And of course the question was asked, and what if we keep it a coupe, or what if we do not extend the doors. Digital Restyling to the rescue…
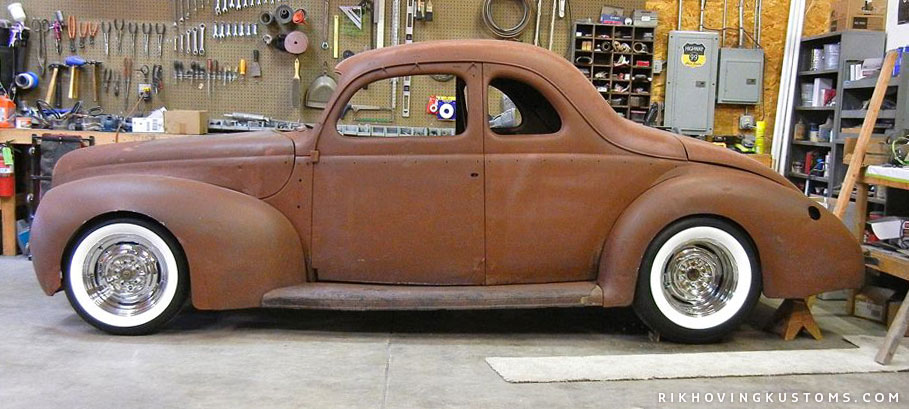 Tony send me and side view image of how the car looked. Don had build the frame with the perfect ride height. The initial sectioning on the body was done and everything was put together for a mock up to see how it all looked.
[divider]
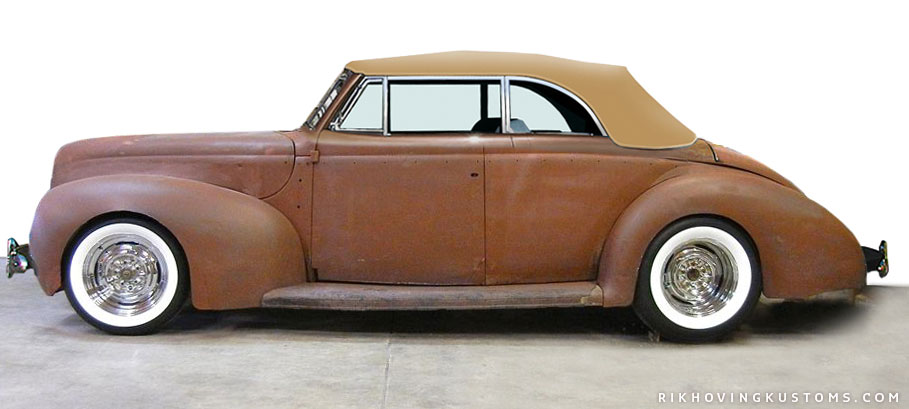 Tony wanted to know how the real car (still a coupe at this moment) would look with the photoshopped convertible top on it. One of the reasons for this was to see what would happen if the shorter coupe doors would remain in place. This photo shows the difference between the short coupe doors with the window frames from the longer doored convertible.
[divider]
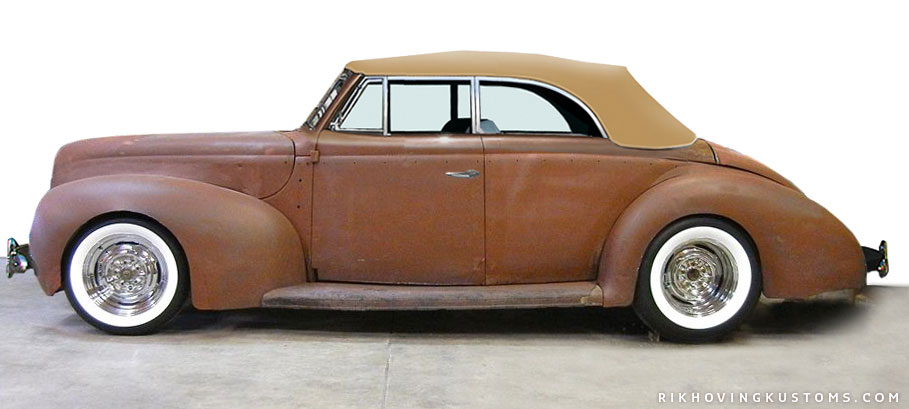 This image shows what would happen when the window frames would fit the short doors. Resulting in odd proportions with a rear side window looking longer than the door windows. Not a good idea.
[divider]
 And this image shows how it all will look, longer sedan doors and the window frames to fit the doors. Everybody on the team was convinced this was the way to go.
[divider]
The Digital Restyled side view images based on the coupe version of the project car with the Photoshopped convertible roof section looks so good that the team was once again convinced the initial plan was still the best plan. So work continued and the coupe top was cut off, and longer two door sedan doors put in place of the shorter coupe doors.
The original plan was to use a 1946 – 48 Ford convertible cowl, windshield and side windows. But Tony was unable to find it for a decent price. So he went with plan B and used an 1951 Ford Victoria windshield and side window frames. The shaped of these units are very similar in shape and the way they work to the 46-48 units, but would require a lot more work than thought at first. Tony asked me to make some visuals to show the side view with the 1951 Ford Victoria windshield and side windows.
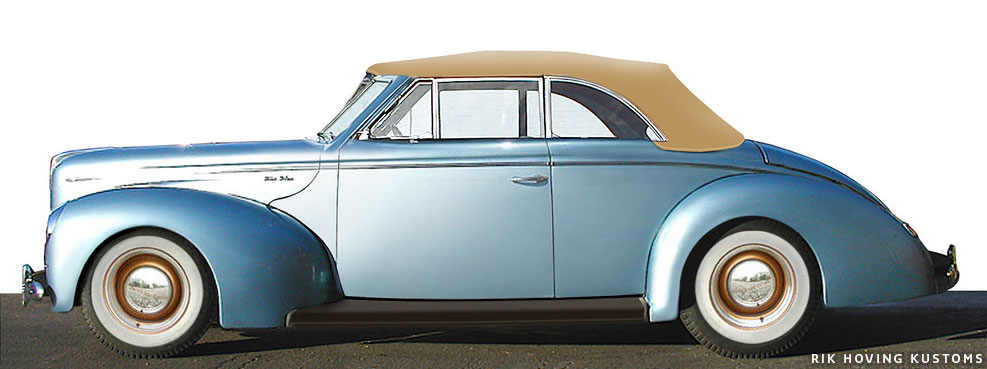 I created this image for Tony to show how the 1951 Ford Victoria windshield and side window frames would look on the 1940 Ford. I left the chopped 1940 Ford windshield in place to show the different angles of the two.
[divider]
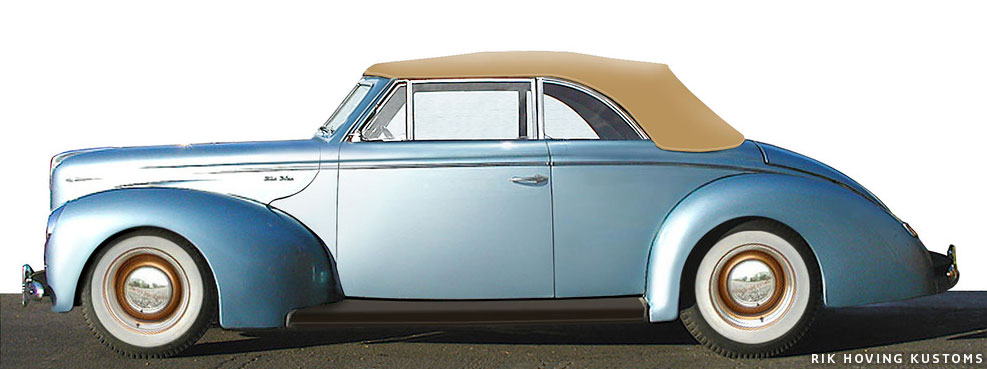 The second image for this step was to show how the Victoria windshield and side window frames would look after they were modified to fit the rest of the car.
[divider]
 More progress work from Don’s shop. Top left, reshaped and raised front wheel openings make sure the wheels fit the opening perfectly. Notice how the lower front corner was extended. Top right shows the 1951 Ford vent window with the stock unit on the right, and the chopped and reshaped to fir the steeper angled windshield version on the left. The bottom two photos shows how great the car is looking already. The raised rear fenders with larger opening looks perfectly in place.
[divider]
During this stage of the build Tony was starting to wonder how the the front end of the car could be restyled to look a bit more elegant. Tony has always loved the looks of the 1940 Mercury hood and grille, and was wondering how a Mercury grille would look on his car. I created another version of the Convertible, and used a narrowed 1940 Mercury grille to fir the car. I slightly reshaped the hood to make it all work. Tony loved the new look. At this stage I also changed the looks of the top a little by raising the side windows a little bit so that they now would match the height of the windshield better and the side profile would become more elegant. Tony started his search for a 1940 Mercury grille and when Don mentioned since it has to be reshaped to fit the Ford why don’t you let me build one from scratch…
 Tony asked me to create a more lighter metallic gray version with a modified 1940 Mercury grille and a reshaped top with less chopped side windows. This version also shows the final wheel hubcap choice.
[divider]
 Don was very busy in the shop recreating the Digital Restyled images. The top left photo shows how the hood had to be reshaped to fit better with the Mercury style grille. The hood was actually extended forward a bit to make it all flow better. The sides were reshaped to fit the fenders perfectly. Top right photo shows the jig Don and his team created to build the Mercury grille. Individual grille bars were cut based on a drawing made from an original Mercury grille bar. The new grille is half way done in this photo. The lower left photo shows how much lower the car looks compared to a stock 1940 Ford DeLuxe. The lower right photo shows the hand made “eye brows” Don created and the red clay shows much the lower edge of the hood needs to be changed to make it all work.
[divider]
For the 2014 Santa Maria show the car was primered with gray primer and the car was put back together for the first time. Tony showed the car at the show and the people seemed to really like the car, even though it was still in progress and far from done. When I saw some photos of the car online there was one thing that caught my eyes. I really liked the way the wheel openings had been changed to make the car sit lower without the tops of the tires being covered. But the changed made to the lower front corner of the front wheels, initially done to make all corners of the fenders look the same, made the front look like an airdam/spoiler. I pointed this out to Tony and he asked me to show him how it would look with more rounded corners.
 The top image in gray primer shows how the car was finished for the Santa Maria show. The bottom image shows the front fenders with the more rounded front corners. Much more elegant. Tony eventually decided to change the fenders to look more like the Digital Restyled image.
[divider]
Tony was invited the the 40 ’40 Fords special exhibit at the 2015 Grand National Roadster show. So Don and his team went hard at work to get the car ready for the show. Tony knew the car would not be completely finished with paint and interior. A lot of work was done on creating a hand made nose trim piece, get the side trim to fit and the windshield frame trim lice cut to size. Once all the hard work was done the car was painted in a dark red primer. This is how the car was show at the 2015 GNRS. And the good thing about this show was that there were all stock bodied 1940 Ford around Tony’s heavily reshaped Convertible, so the spectators could compare them and see how much work was done to create this very stylish convertible. A perfect mix between Valley Custom Shop styling and more modern Hot Rod looks with the forward rake and chrome wheels.
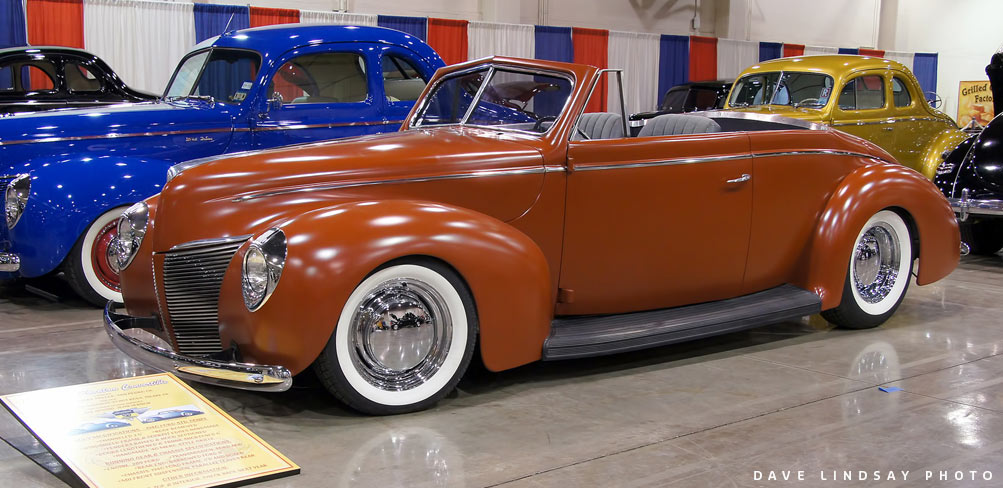 Dave Lindsay took this great photo of Tony’s car on Set-Up day at the GNRS. The stance the shape and overall looks and balance of the car is absolutely stunning. kudos for the team at Don Dillard’s Highway 99 Hot Rod shop.
[divider]
 That is Don Dillard backing up the car on Sunday night after the GNRS show has ended. This rear view shows how well balanced this car is, no matter from which side you look at it.
[divider]
[box_light]
Are you day dreaming about your own perfect dream custom?
- Do you wonder what your precious car would (or could!) look like, even before you start cutting on it?
- Would you like to see different paint variations and styled on your custom car before you even start to mask the car, or order that expensive new paint?
- Or would you like to see the difference of a 2, 3 or 4 inch chop and see the impact it will have on the rest of the car?
- Maybe you want to see any other modification done to your custom car, without having to actually perform that modification and find out a different modification would have worked better with the rest of your car?
Do you suddenly see all the possibilities? Perhaps now is a good time to contact Rik Hoving and ask him about the possibilities of his digital Restyling options. Request are free of any obligations.
[/box_light]
![]()


I am absolutely dumb-struck with the transformations created here. “Absolutely stunning” sums it up. I see the Valley Custom influences (the Glen Hooker convertible), but from there, Wow. Thank you so much for sharing all aspects of the design, styling changes, and the actual build of this piece of rolling sculpture.
I especially love the nod to the Mercury frontal appearance, but with 21st Century capabilities to create a frontal statement that belongs to this car alone. And belong it does! The formed, painted center strip is brilliant. Subtle changes, but brilliant!
Larry Pointer
Rik and Tony….
What a beautiful car in every way. Thanks for taking the time to detail the process and show how an international team can work – both “hands-on” and “digital.” The result is beautiful – and has a presence in the photos above. I even like the latest color but I do understand it’s red primer. What’s the final color going to be?
Beautiful work “Team Tony!”
*wink*
Geoff Hacker
Tampa, Florida