Neferteri Part Eight
NEFERTERI Part Eight
Herein, our Forrest Gump embarks on a quixotic crusade in search of elements from the Golden Age of the Classics.
Larry Pointer found himself a survivor of Y2K, retired, a widower, and a more or less empty nester. He needed a project. In this series, he shares his passion for all things “Streamline Moderne”, and how it all turned into a 13-year labor of love, to create “Neferteri“, his custom Diamond T truck.
By Larry Pointer with Rik Hoving
Neferteri, Part Eight
Forlorn is about the best could be said of my 1936 Diamond T grille shell. No Art Deco waterfall grille in shiny stamped sheet metal graced its open maw. But that’s not a bad thing. Frankly, I wasn’t a fan of that historic hiccup, before the Cadillac of trucks morphed its face for the Forties into a 1938 Buick on steroids. The 1936-37 grillework definitely was Art Deco, but more like the face of a drive-in speaker than any rolling sculpture.
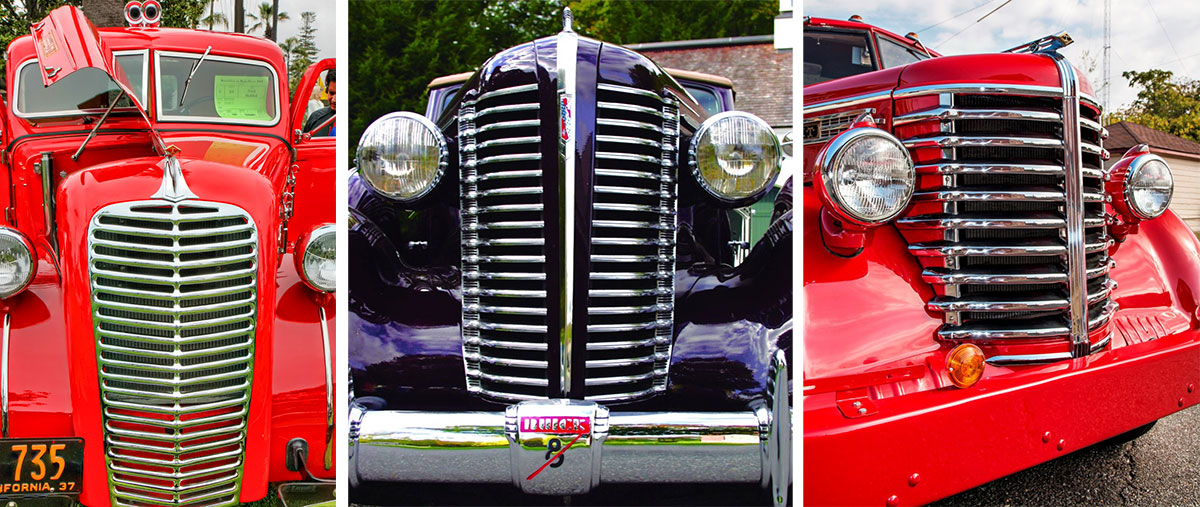 From left to right; 1937 Diamond T, 1938 Buick grille, 1948 Diamond T grille
[divider]
 Drive-in Speakers, common items for those who crew up with the drive-in theater’s. (many younger viewers never have seen a drive-in movie. Sad)
[divider]
Instead, I had borrowed Gordon Buerhrig’s 1935 facelift for the struggling Auburn flagship to grace my own Art Deco dream. What better streamline concept truck than a marriage between Auburn and Diamond T? For help in scale and proportion, I threw myself on the tender mercies of the Auburn-Cord-Duesenberg Museum. There, archivist Jon Bill came to my aid. With stretched dimensions in hand, I was off and running. I had the WHAT of what I needed; the HOW still continued to elude me.
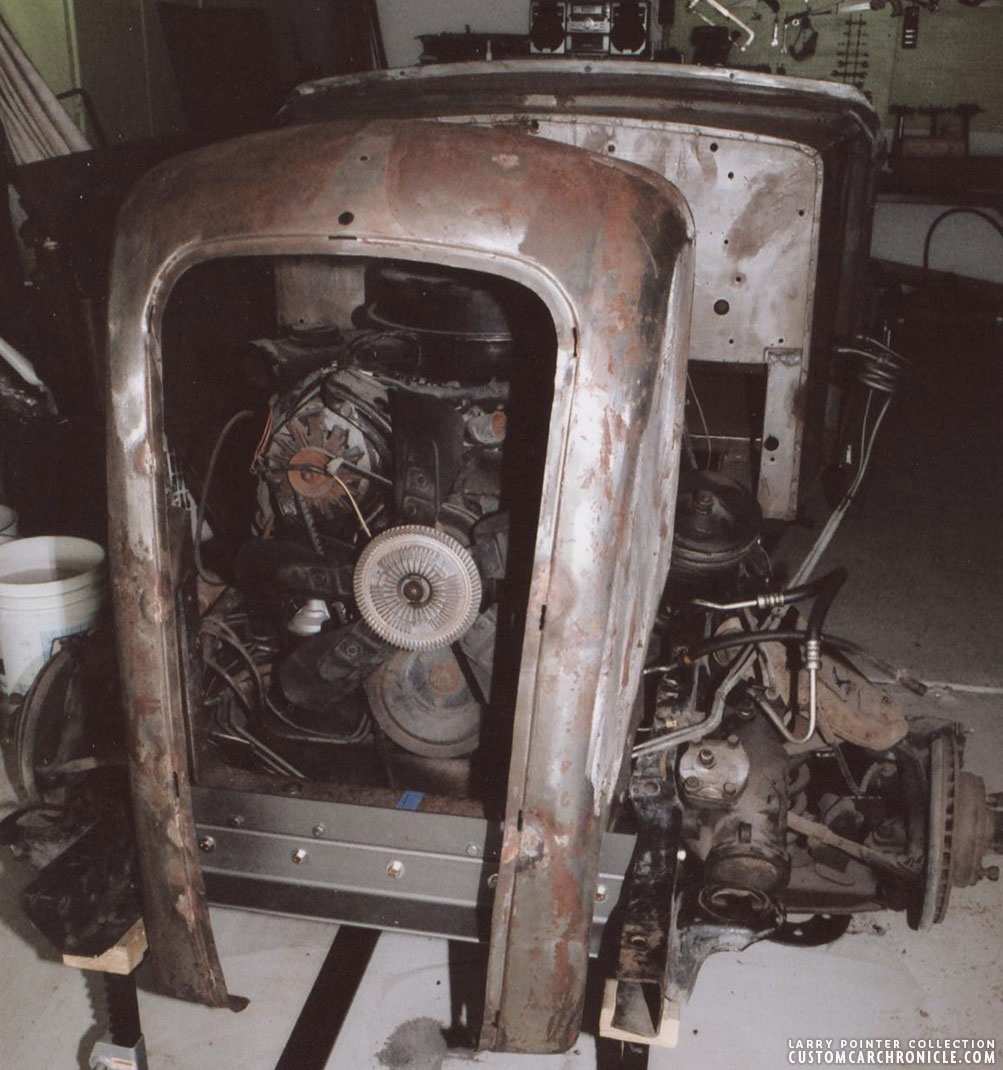 Original 1936 Diamond T grille shell I started with.
[divider]
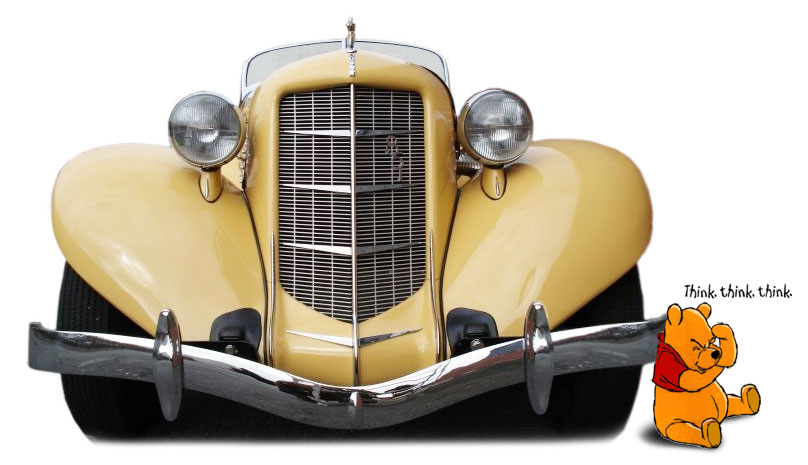 1935-36 Auburn grille…
[divider]
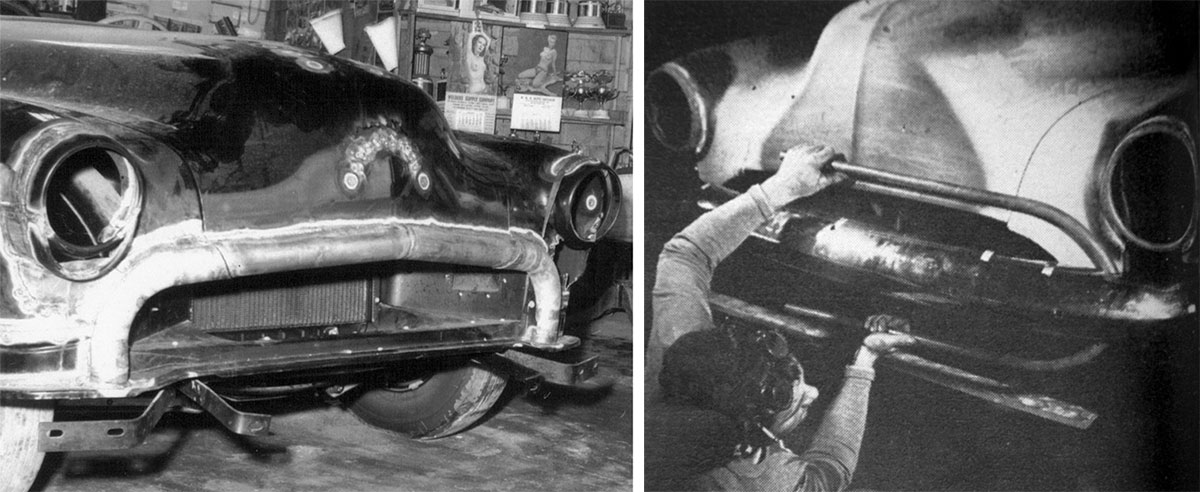 Example of grille surround created from large diameter tubing by Barris Kustoms on the left and using some smaller diameter tubing by the Valley Custom Shop used on Jack Stewart’s Oldsmobile “Polynesian”.
[divider]
If George and Sam Barris and the Valley Custom boys could create their grille surrounds in exhaust tubing, it was the way forward for me. First though, I needed an inexpensive mock-up. Quite by accident I discovered the cardboard tubing inside Christmas wrapping rolls was exactly the same diameter! And a lot cheaper to whack into the required lengths, angles, and curves I envisioned. Once it was laid out and adjusted to the Diamond T height and width, I was ready for Darryn Waldo to pass over the real steel for cutting and ticky-tacking.
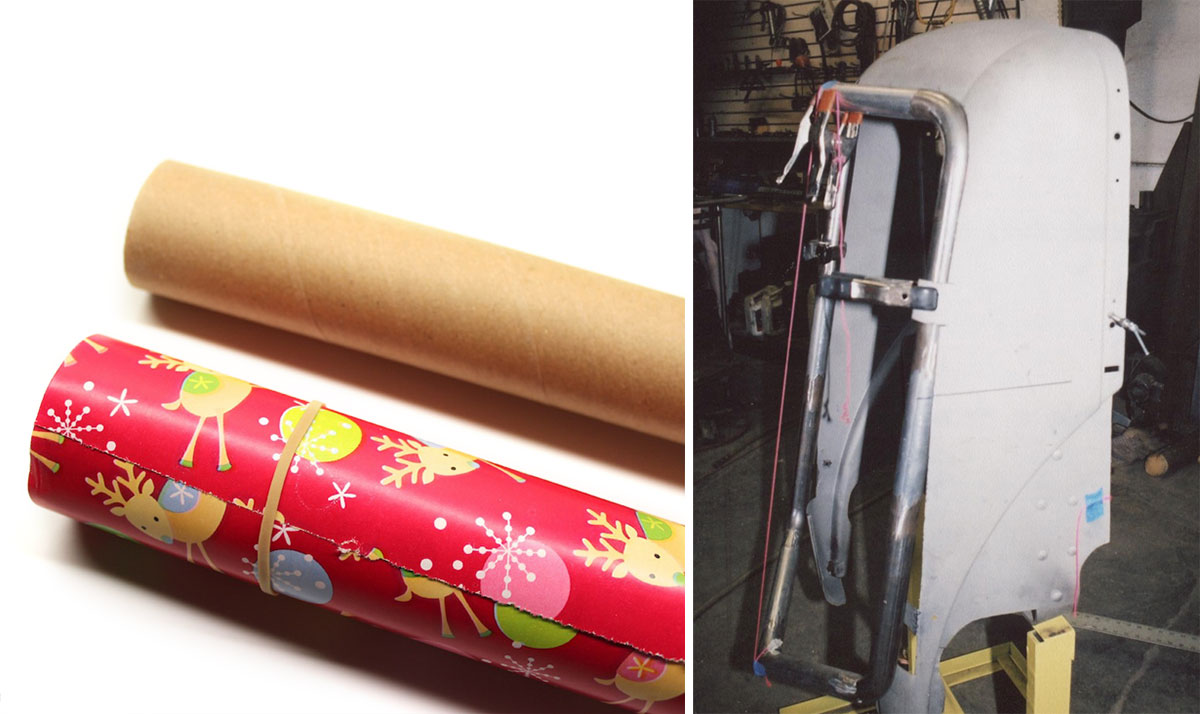 Christmas wrap tube on the left turned out ideal to mock up my new grille surround before I bought the actual metal tubing and had it bend in shape. On the right you can see the roughed in exhaust tubing clamped to front of my Diamond T shell.
[divider]
The handsome expanded stainless screen of bygone days was no more. Scott Clark showed me an alternative, though. And it stood literally in my face on a daily basis as I went in and out of his shop. The behemoth Peterbilt tractor-trailer rigs sported a frontal grillework that was almost a dead ringer for that sported by the Auburn boat-tail speedster. After a few visits to repair shops and salvage yards, I was able to score one that hadn’t played block and tackle against a four-legged foe, or worse.
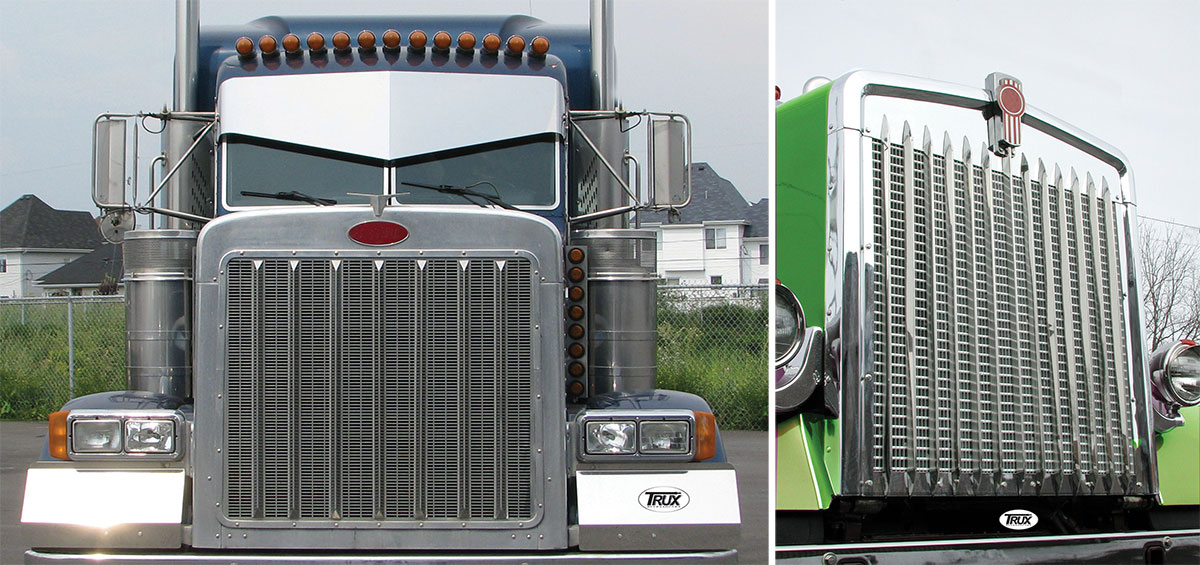 Peterbilt truck with the stainless screen I used in building my “Auburn” grille. The Kenworth truck on the right shows the style of bars and “teeth” I carved down for my grille.
[divider]
The center bar and teeth I was able to clone from yet another 18-wheeler. This time the vertical aluminum grille bars of a Kenworth. It didn’t take long for me to gain a deep appreciation for the values of an open faced file, in the task of whittling down the pieces for the three cross bars of the Auburn’s trademark dental work.
 Buzz Franke studying the bare shell and how to incorporate the new panels and exhaust tubing surround. On the right photo we can see Buzz Franke forming a template for bottom of the shell.
[divider]
 The finished tubing grille surround now tacked to the 37 Diamond T shell.
[divider]
Yet, that all turned out to be the easy part. The Auburn’s vertical face was straight, and raked back to a jaunty angle. Jaunty hardly described the bulbous bustle nose of the Diamond T shell. Buzz Franke stepped in to direct the match-up of this odd couple. His studied eye in fabrication was a clinic in customizing, a privilege I never will forget, rest his soul. Finally, to achieve the crowning touch, Ron Tesinsky drug out his English wheel to create the cap of the structure. It came out much like a big brother to the iconic 32 Ford grille shell, as well as that of Buehrig’s classic Auburn.
 Close up of the lower grille section, piecing together the shell with the tubing. On the right Buzz with partner Jerry Lafountain checking alignments.
[divider]
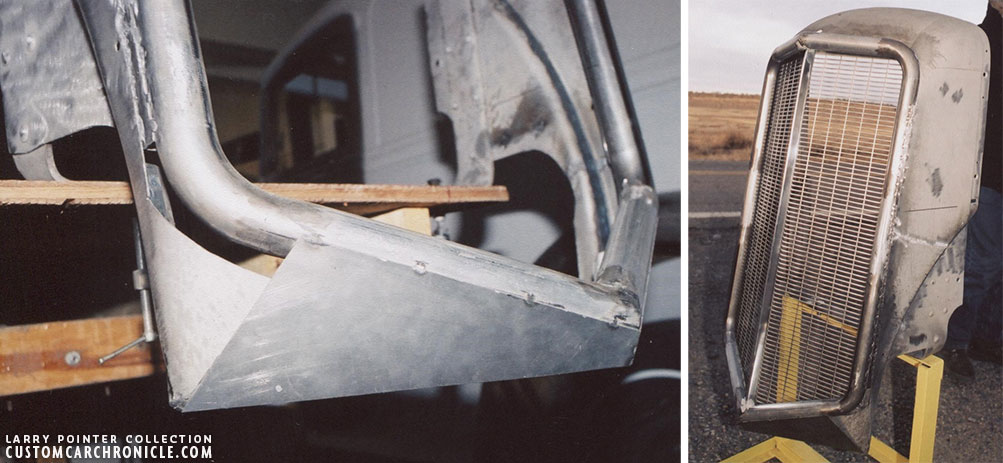 Lower piecework, adapting tubing to original grille shell on the left and on the right the Grille is now ready for fabrication of top of shell.
[divider]
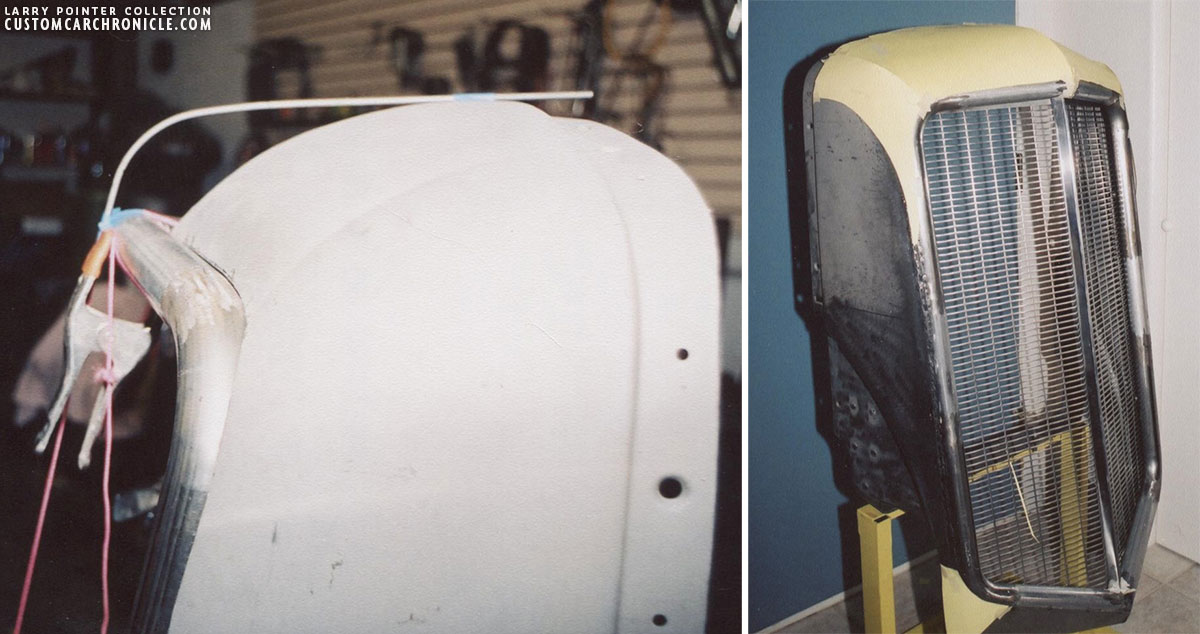 Shaped rod clamped in place to determine form of top of shell, followed by Paper templates in place for shaping top of grille shell.
[divider]
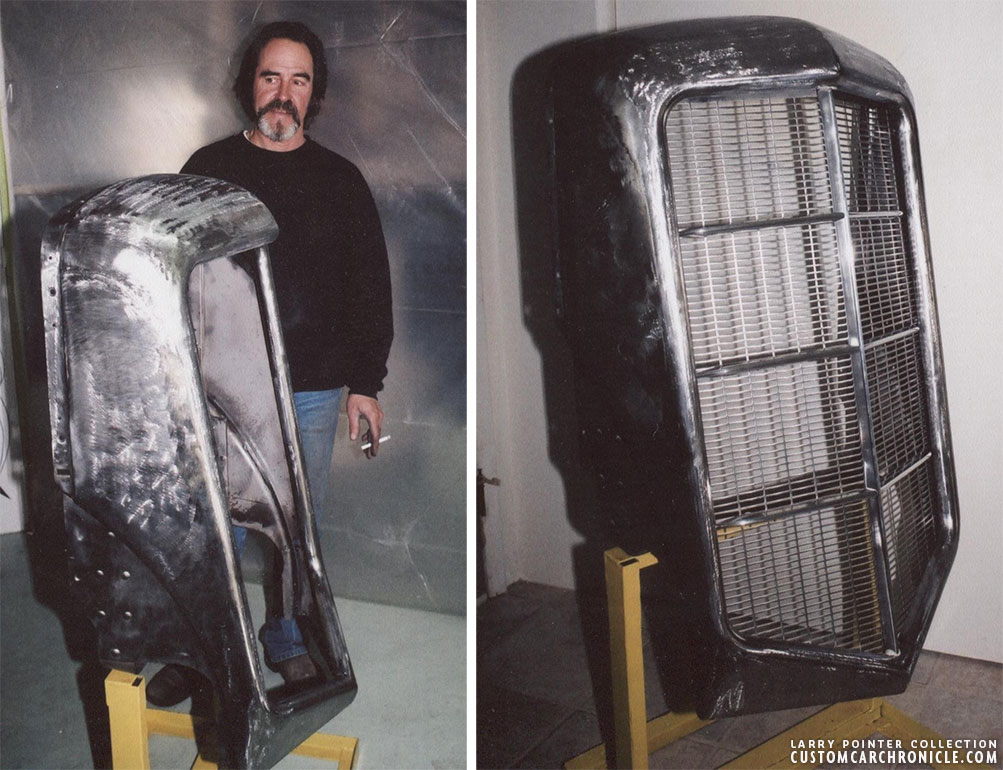 Ron Tesinsky with completed grille shell, bare metal. Ron shaped all the sheet metal on the grille surround with English wheel. On the right, grille back home on stand.
[divider]
I was so proud of what we had done, I built a stand for our bare metal “sculpture”, and stood it in my bedroom.
Until…., well… Two years later Dotti and I were married. It was no contest. Neferteri moved out to the shop. A girl thing, I think.
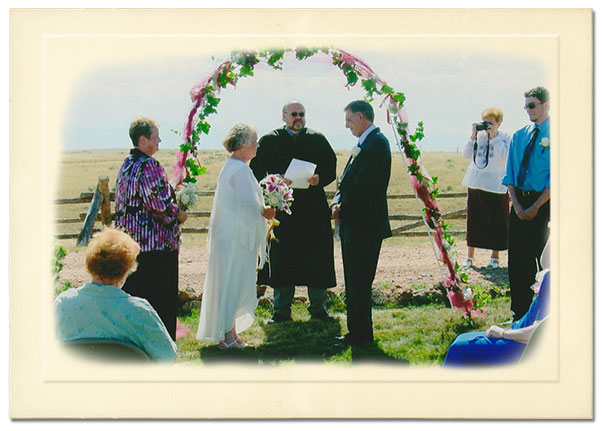
Fast forward to 2013. That bucket list we all carry. Wishful thinking. Without Dotti, much of my bucket list only would have remained a “woulda, coulda, shoulda” wish list. Dotti was on family history quest, and we planned out a trip, retracing back her family’s migration West to Montana. Well, along the route through Indiana…umm, almost on the way…was Auburn, and the Auburn Cord Duesenberg Museum. After a short detour, I found myself standing in front of that very Mecca of Classic Car celebrants. Soon, I was shaking hands with Museum archivist Jon Bill, the very man who, a decade before, had helped me scope out the dimensions I needed in creating Neferteri’s “Auburn” grille. That day stands out as one of those “most memorable” moments of Life’s special treasures. And to have Jon request images of Neferteri for the Museum archive was…beyond words!
 Me in front of ACD Museum, 2013. and on the right Me, on the left, with Jon Bill, on the right, archivist at ACD Museum who ten years before, in 2003, had helped me come up with conversions to adapt the 1935-36 Auburn grille dimensions to the larger Diamond T grille shell.
[divider]
As I looked back over the progression of the project, visions of perk charts danced in my head. Jack Whittington had started the wiring, and in tidy Air Force style, he ran wires through lengths of brake line tubing to hide them. The idea to hide the fuse box inside a kitchen toaster masquerading as an Art Deco heater under the dash was, well, my idea. John Stroble took on the brakes. And Darryn Waldo came to the rescue in configuring the air conditioning components to avoid defacing my firewall mural space.
Air conditioning? You ask. Didn’t the Diamond T have individual roll out windshields? And cowl vents down on the sides, in front of the doors? Yes… but. Dotti surprised me with the gift of a complete Aftermarket system. In another compromise, the new hidden hinges Darryn had scored meant the cowl vents had to go.
The solution that we worked out was to run hoses under the firewall and floor to a mounting position behind the seats, on the extended floor board. Venting then later could face forward, beneath a raised platform behind the seats and through a console between the seats, as well as up and over the door frames to that above-windshield glove box panel, via pvc piping.
 AC unit on bare floor of Neferteri.
[divider]
But that would be later. Actually, years later. Thirteen years and counting; I still don’t have the system charged, nor the defroster vents louvered in above the windshield. My bad. But is a custom ever done? Really DONE done? Those roll out windshields are working really swell, though.
 Jack Whittington, who wired Neferteri on the left, and John Waldo and father Darryn Waldo crimping AC hoses on the right.
[divider]
How to build an extended cab? I still had the poster board pattern I had used to saw out my 10 gauge floor. Scott Clark had salvaged some heavy duty bakery racks, and I glommed onto one. I surgically removed its base on wheels, to then began assembling parts and pieces of the four C. A. Tilt truck cabs I had purloined. To align the parts and hold everything in position, I built a cage of braces in bracketed ½” tubing. It looked like a Rube Goldberg cartoon, but it did the job.
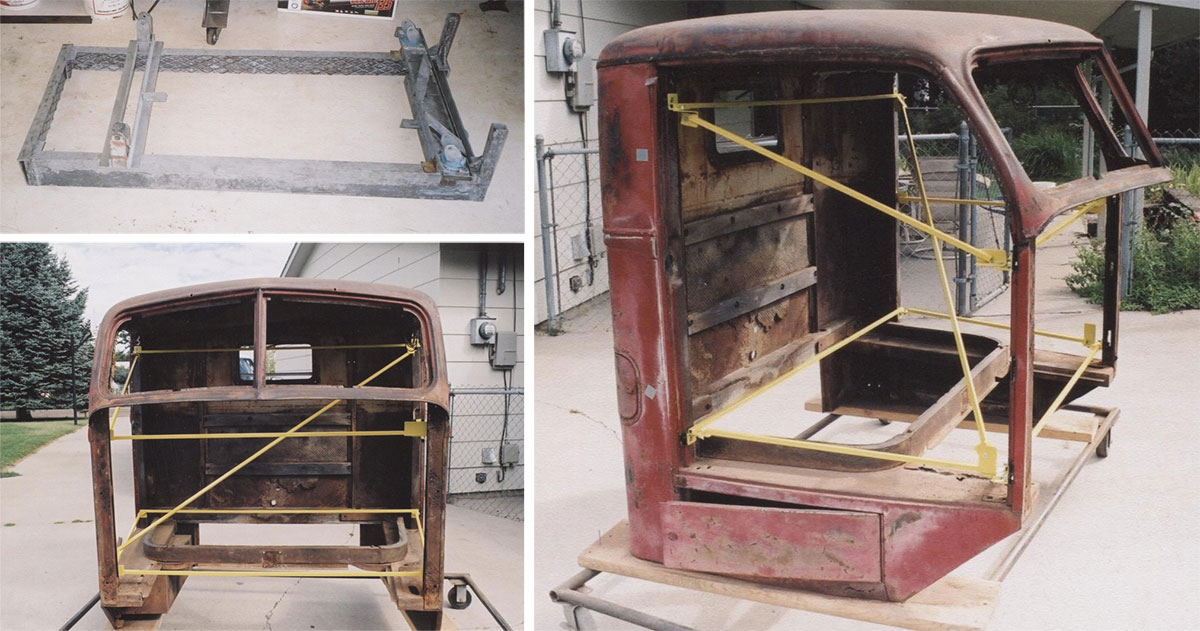 Top left shows the Bakery rack frame I used parts from for cab gurney The other two photos show the stock cab on bakery rack gurney.
[divider]

Buzz guided me on extending the cab length. One set of quarter panels were sliced vertically behind the stamped door frame. Another set was cut parallel to these, but 4” back. For backing, we tacked a narrow strip behind the cutline to hold the pieces in line, then I slowly welded up the long seam.
 Buzz Franke studying cab extension. Extended and reinforced to hold its shape cab on gurney.
[divider]
Quarter windows. With tried-and-true poster board, I cut out several variations of shapes for the quarter windows I wanted. Standing back, I studied each, with a door clamped into position for proportioning. Then, to create window openings consistent with those of the doors, I actually used doors as donors. Each quarter window surround is made up from the rear portion of a pair of door window frame elements, left and right, set facing each other and welded in the middle.
 Quarter window template.
[divider]
The center back panels of the cabs I had gathered all were worse for wear. I sliced out the best beltline, then added new sheet metal panels above and below, attached to a 1/2” square tubing frame on the inside. At this juncture, everything was pretty much held together with C-clamps. Perhaps the best advice I received along the way was, “You can never have enough C-clamps.”
Diamond T’s had a small, square rear window. In my humble opinion, they looked more like they belonged on an orchard tractor than the Cadillac of trucks. In stark contrast, all of the classic cars of the era sported long and narrow rear windows. They just spoke “elegance” to me. So, I cut up what rear window frame stampings I had, and built my own long, narrow, elegant rear view. Then I centered and welded them into that new flat sheet metal I’d grafted into the rear of the cab.
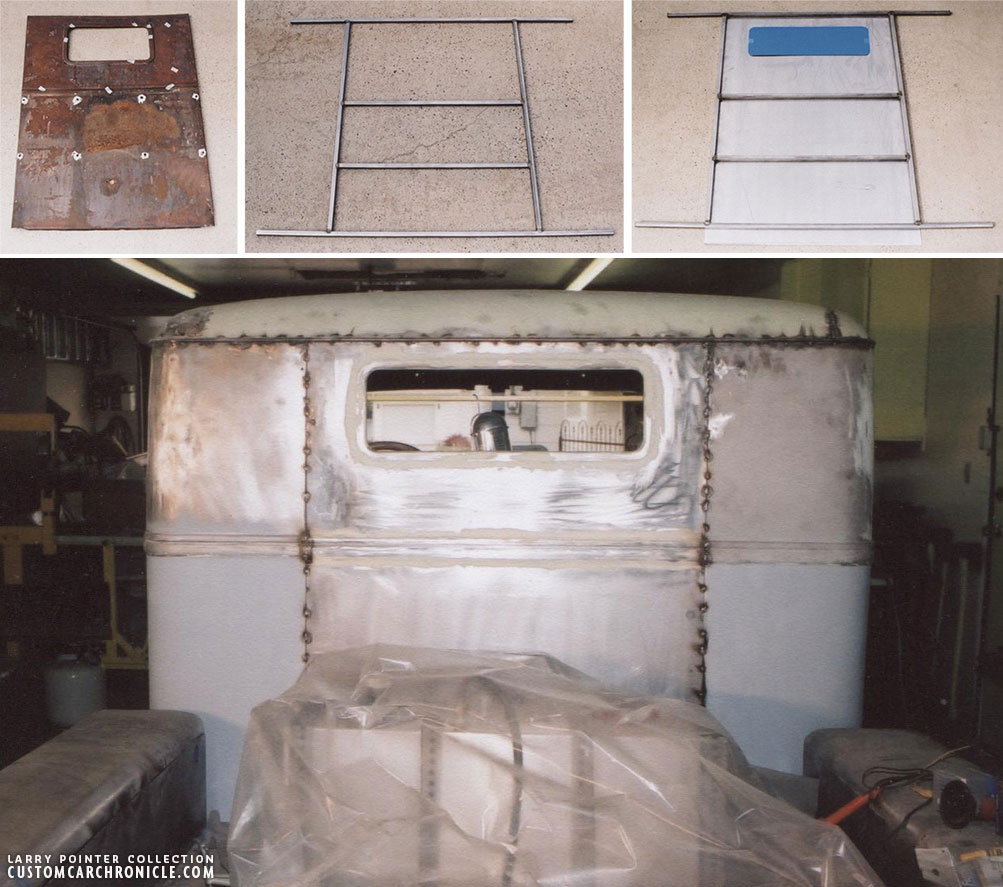 From left to right on the top; Original Diamond T back panel, 1/2″ tubing inner framework for new cab back panel, back panel with template for new rear window. The picture on the bottom shows the back panel installed with new much wider rear window opening.
[divider]
Welding. The roof was next. I sorted through the roof panels and selected a pair least ravaged by the collateral damage that came with time in service. You know, hay bales, logs, amateur hip-hop dancers. One panel was sliced off, just above the new quarter windows in my cab. The second panel was laid up from the rear alignment. I picked a line of consistent loft in the sandwiched panels and cut a horizontal slice down through them together, from one side of the top to the other, to create an extended top. As with the vertical quarter panel extensions, I cut out a narrow strip from the leftovers, for support beneath the seam. Thanks to the genius who invented Cleco pins! Welding the seam across that roof expanse was made much easier.
By now, the cab gurney had given way to actual construction onto the floor base plate now securely bolted to the chassis. Running boards were next. That lattice framework beneath the floor included outriggers that, as well as for catching shins daily, now served for attaching the running boards. Again, each running board was extended lengthwise, thanks to the sacrifice of a second set of boards for the added length.
 The extended cab is now back on the frame with the fender installed we could extend the running boards to fit the longer cab. (This photo was taken prior to 3/8″ rod drip rail replacement)
[divider]
Thanks to Charles Tilt’s cab of assembled parts, I was able to adjust individual panels at will. To finally attach the extended roof, I trimmed and clamped it down for final welding. At this point, a little “chopping” was in order. The stock Diamond T cab rose up rearward into an annoying peak at the rear. From a side view, this uphill slope really disrupted any “streamline” flow in styling, front to back. It had to go away. I pulled the roof down in back, and trimmed it off at the dripline. Tilt also had made the drip channel a separate piece, tacked into a wooden header strip inside. Following this alignment, the Diamond T stampings were now fully replaced with a molding I bent to form with 3/8” rod.
 Roof extended, rear 3/4 view with the new drip rail in place. On the bottom an aerial view, extended cab, with seams filled.
[divider]
More welding. Lots and lots more welding ahead. I was becoming a frequent flyer to the local welding gas supplier.
Up front, the original Diamond T roof panel had been bolted to the top of the cowl, through the A posts and below the windshields. A length of welting was sandwiched between the metal panels to eliminate squeaks. Here was my opportunity to suck the roof down a bit more, and wipe out the ugly gasket distraction interfering with that coveted “B-17” flow of the windshield lines I so admired. While I was at it, I formed a Duvall Vee piece for emphasis, bottom center between the windshields. I continued the Vee theme in striking a sharp line down each A pillar to taper into the belt molding at the cowl. Duesenbergs, Packards, Marmons, and best of all: the Stutz Monte Carlo. The classic cars of the period all had that wind slicing aircraft/speedboat look I wanted Neferteri to share.
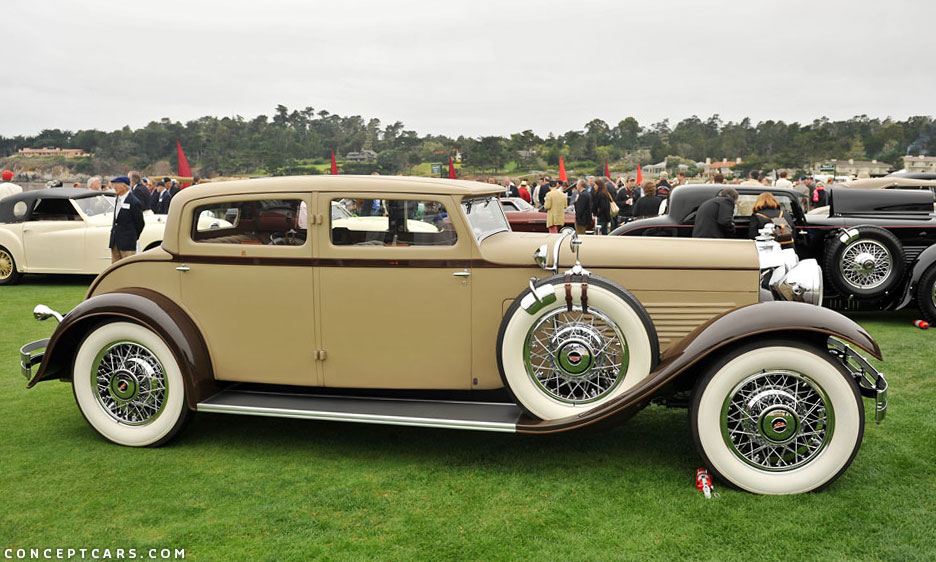 1930 Stutz Monte Carlo. This is the A pillar bottom shape I wanted, as it flows downward and forward into the beltline extending out into the hood panel.
[divider]
 Close up, original cab A pillar.
[divider]
 Close up, Duvall-like center pillar piece.
[divider]
 My reshaped A pillar (A little ahead in sequence, I only had a good image of it already in paint!)
[divider]
Stylin’! That 2003 drawing was beginning to emerge in 3D. I was on a roll! And I was only six years into the build. The words of my uncle Willis whispered in my ear, “You don’t holler Whoa in the middle of a horse race.”


Next, we will clean up those front fenders, attach the doors, and streamline the scene behind the cab…. Stay tuned.

(This article is made possible by)
![]()




Nice! It’s easy to forget just how much work that was!!! Still amazes me!
Wow Larry! I always wondered about that grill from the first time I saw a picture of your truck.
Amazing what can be done with a pile of parts. 🙂
Torchie
That grille turned out to be just the right look for your Diamond T. I was not aware of the scale and complexity of building your truck until I saw your pictures. Nice job!
Lots of very interesting details went into this build…really nice to see them highlighted in these articles 🙂
amazing the amount of detailed changes were planned into this build! beautiful job larry.
Memories of my visit to the ACD museum in 92. Had two hours to myself and my 57biarritz had a flat tire in the car park when I finally came out at 6pm.
Great work on the grill and the a pillar sweep.
the work that went into building ur truck wow lots of plannig an thought but it sure came out looking awesome one of a kind larry love all them photos an ur story on building it thumbs up,,